Introduction
This tutorial leads you step-by-step through a simple Adaptive Conjoint Analysis (ACA) study, from thinking about a marketing problem, planning a questionnaire and creating a new study in Lighthouse Studio, to entering a list of the attributes and levels, generating and testing the questionnaire, and analyzing the results.
Lighthouse Studio is a powerful program, and this tutorial only touches on the basics for running an ACA survey. You'll become aware of different or more sophisticated approaches by reading other sections in the on-line help and by experimenting with Lighthouse Studio.
We also suggest the following two articles, available within our Technical Papers Library at http://www.sawtoothsoftware.com/support/technical-papers: "ACA Technical Paper" and "History of ACA."
(Note: this example and the data presented are purely fictional. The suggested steps represent one approach to this type of marketing problem, but may not necessarily reflect the single "best" way to conduct such a research study using Lighthouse Studio. This tutorial only uses 5 attributes, to make sure that it can run within student lab systems that are limited to 5 attributes. Most ACA studies have between 8 to 15 attributes.)
The Marketing Problem
An old college pal of yours named Gary calls you one day and invites you to dinner. You don't have other plans, so you readily agree. After all, it's been years since you've seen him, you'll be eating at the finest steak house in the city, and--most importantly--he's buying.
Gary was a very bright double major in chemistry and business. You once talked him into taking a graduate-level marketing research course with you, which he reluctantly did, but his heart was clearly in chemistry. After graduation, you both went your separate ways--you to a successful consulting career, and Gary to a manufacturing company specializing in rubber and plastics.
At dinner, it doesn't take long to learn why Gary was so willing to pay. Gary mentions that his company, Electra, Inc., has been developing next-generation foam rubber compounds, and has been hunting for new markets to apply the technology. Gary, an avid mountain biker, tells you that the new materials might be used for puncture-proof bicycle tires.
As you dig into your medium-rare porterhouse, Gary explains that mountain bikers often ride into remote areas. If they puncture a tire, it could mean a long walk home. Consequently, many carry extra inner tubes and tools to repair a tire if needed.
"The main problem," Gary admits," is weight. Solid core tires are heavier than traditional inflatable inner tube tires, which might turn off many riders. And the more dense and durable the foam compound, the heavier the tire." Gary rattles off facts related to typical tire weights compared to weights of solid foam core tire prototypes Electra had already developed. By this time, Gary's steak is only half-eaten and getting cold, but he doesn't seem to care.
He further explains why the firmness or softness of a tire matters. When biking on paved roads, a very firm tire with a smooth tread is most efficient. "Bikers who do a lot of aggressive off-road dirt riding will often take some air out of the tires to increase the amount of tread area that grips the trail, and to absorb some of the bumps," he explains. He points out that with regular inner tube tires, a person can adjust the air pressure of the tire to fit the conditions. "With a solid core tire," he notes, "you'd be stuck with just one firmness."
"The tread pattern is also important," he continues. "Off-road riders need an aggressive tread, but people who ride mainly on paved roads need a relatively smooth tread." By now his steak is chilled and nearly inedible, so the waiter takes it away (but not before asking Gary if the steak hadn't met his expectations). You both order up desserts. Gary rambles another ten minutes about marketing strategy--specifically whether his company can market the product on its own or if it might need to pursue an alliance with an established mountain bike tire name.
"Can you help us do a research study to figure out what kind of interest bikers might have in a solid core tire, and the proper combinations of weight, tread pattern, durability, and firmness?" he suddenly asks. The abruptness of his question catches you by surprise. You confidently smile, however, as the thought occurs to you that Gary should have paid more attention in that graduate marketing research course. Only five minutes into Gary's presentation you had already been thinking about how a trade-off analysis technique like ACA might help answer these issues. You remind him about the one-week unit on conjoint analysis that you both completed in that graduate-level marketing research class. After some refresher, his eyes light up at the idea.
Together, you develop a list of key questions on a napkin:
1) Would mountain bikers accept a solid core tire? What types of bikers would it most appeal to?
2) How might bikers trade off tire weight and tire firmness for the solid core tires? At what point would the heavier weight of solid core tires significantly limit demand?
3) What tire tread patterns might be preferred for a solid core tire?
4) Does it make sense to align with an established player in tire manufacturing, or can Gary's company market the tire under the Electra name effectively?
As you part ways for the evening, you invite Gary to your office to further discuss the problem and possible solutions.
Study Scope and Budget
The next day, you receive an E-mail from Gary. He reports that there is good support at his company to conduct some market research. However, the budget he has been given to work with is limited. He suggests a small investigational study with about thirty respondents. (Most ACA studies in practice include much larger sample sizes.) He floats the idea that mountain bike enthusiasts might be brought to a central facility, shown the prototype tires, and take an ACA survey.
In a return E-mail, you agree that Gary's approach might work well, but caution him that using just 30 people to draw conclusions regarding a market of hundreds of thousands would be quite a stretch. "The data must only be used to form initial hypotheses, " you warn. "Before drawing firm conclusions, those hypotheses should be tested by another study with a larger sample size."
Defining a List of Attributes and Levels
The following week at your office, you and Gary review the objectives written during your dinner conversation on the napkin. You propose that you take the hour together to start thinking about some conjoint attributes and levels.
Gary joins you in the small conference room. It has a large white board and markers, which would prove useful, and a dish full of peanut M&Ms, which you have a particular weakness for. Before diving in, you review some ground-rules regarding conjoint attributes and levels. You summarize the following rules at the top of the white board:
1. Attributes should be as close to independent of one another as reasonably possible. ACA (like most conjoint techniques) assumes a simple additive model, and violations of simple additivity within ACA are nearly impossible to detect.
2. Because attributes are independent of one another, the levels across all attributes should be able to combine freely.
3. Levels within each attribute must be mutually exclusive. Tires are described using a single level from each attribute.
4. Because just the level text appears on ACA's screens when defining different tire choices, the text for each level must stand on its own.
Because of the small sample size in the study, you recommend that each attribute include few levels--perhaps three or four at most. With larger sample sizes, you might have decided to measure four or even five levels of "quantitative" (ordered) attributes like weight and tread durability.
There is rarely a need to measure more than five levels of an ordered attribute, you explain, as the market simulator lets you interpolate between measured levels during analysis. Including too many levels for an attribute significantly lowers the precision of the utility estimates for each level. It also can lead to a problem in conjoint analysis called the "Number of Levels" effect. Attributes defined on relatively more levels tend to get an artificial boost upward in importance. ACA is less prone to this bias than other full-profile conjoint methods, you assure him, but it is still a concern. By this time, you notice Gary's eyes beginning to glass over, so you cut to the chase.
"OK then," you announce, "the primary objective seems to be to compare the standard inner tube tire to the new foam core tire. Let's begin by writing down those two levels." On the white board, you write:
Tire Type
Standard inner tube tire
Puncture-proof solid foam core tire
"And we need to ask respondents to consider the different degrees of firmness of the solid core tires," Gary interjects. "Some people might want a firm tire, and others less firm." You agree, and write another candidate attribute with its three levels:
Firmness of Solid Foam Core Tire
Very firm (best for pavement)
Somewhat firm (for pavement or dirt)
Less firm (for best traction in dirt)
After specifying these first two attributes, you immediately notice a problem. "It seems that these attributes already violate ground rules 1 and 2," you declare. Gary furrows his brow in thought. You continue: "It wouldn't make sense to combine any level of the second attribute, Firmness of Solid Core Tire, with the first level of the first attribute, Standard inner tube tire."
Gary nods in understanding, and suggests a possible solution: "Don't conjoint analysis methods let you prohibit certain levels from combining with others? Let's just prohibit the firmness levels for solid core tires from ever appearing with the standard inner tube tire."
"Prohibitions are usually detrimental to conjoint studies," you begin. "And if it seems that you absolutely need to prohibit certain level combinations, it might just be pointing to poor attribute design." You pause a moment for effect. "I think this is one of those cases," you say. "In ACA, each product concept is defined by exactly one level from each attribute--one cannot just skip an attribute for a given product alternative. When you have attributes that only apply to some alternatives or brands, those relationships require an 'alternative-specific' design. A different kind of trade-off technique called Choice-Based Conjoint can deal nicely with alternative-specific designs." (Gary gets a glassy-eyed look.) You explain to Gary that the objectives of his study (small sample size, product design research, possibility of computerized interviewing) seem to align nicely with ACA, so you will need to think of a way around the problem. After a few moments, the solution occurs to you.
Rather than treat those two attributes ("Tire Type" and "Firmness of Solid Core Tire") separately, you recognize that there are really only four unique ways the levels of those attributes can logically combine. You decide to collapse the two separate attributes into a single one with the four possible conditions:
Tire Type/Firmness
Puncture-proof solid foam core. Very firm (best for pavement)
Puncture-proof solid foam core. Somewhat firm (for pavement or dirt)
Puncture-proof solid foam core. Less firm (for best traction in dirt)
Standard inner tube tire. Adjustable firmness (for pavement or dirt)
With that hurdle behind you, the next series of attributes flow more easily. As for tire weight, the folks at Electra determined that a solid core tire might weigh twice as much as a standard tire. A more expensive process and compound could reduce the weight to about 50% heavier than a standard tire. You write:
Weight
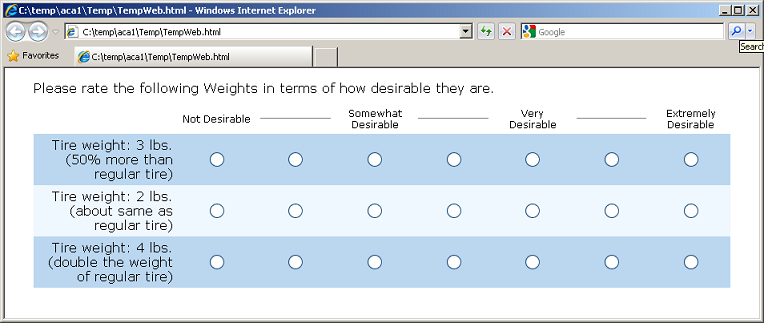
Tire weight: 2 lbs. (about same as regular tire)
Tire weight: 3 lbs. (50% more than regular tire)
Tire weight: 4 lbs. (double the weight of regular tire)
Gary takes the marker from you and quickly lists three common tread types on the board:
Tread Type
Off-road tread
On-road tread
On-road / Off-road tread
He then lists his company along with two key tire makers that his firm might either have to compete against or form an alliance with:
Brand Name
Michelin
Tioga
Electra
Finally comes the issue of tread wear durability. He writes these levels on the board:
Tread Wear Durability
Tread lasts for 1000 miles
Tread lasts for 2000 miles
Tread lasts for 3000 miles
You nod approvingly, while grabbing another handful of M&Ms. Seems that he is catching on--and quite enjoying the process. The meeting has been a success. You shake hands, and walk Gary to the door.
A Sample Scripted Questionnaire
A few days later, you receive another E-mail from Gary. He has scripted some expanded attribute definitions and a few additional questions to ask study participants. You put that together with some text you usually use for ACA studies, creating a unified document:
Start:
Thank you for agreeing to participate in this research study!
We are asking mountain biking enthusiasts like yourself to help us plan and develop new high performance mountain bike tires. This interactive survey should take about 10 to 15 minutes of your time.
Click the Next button below to continue... |
Miles:
How many miles per week on average would you say you ride your mountain bike? m Fewer than 10 miles m About 10 to 25 miles m About 25 to 75 miles m More than 75 miles
|
Triptype:
Which of the following best describes you?
m I always ride in areas where I could call a friend or "hitch a ride" if I had mechanical difficulties. m I sometimes ride to remote areas where I would have to either repair my bike or walk my bike out if I had mechanical difficulties. m I frequently ride to remote areas where I would have to either repair my bike or walk my bike out if I had mechanical difficulties.
|
Terrain:
Which of the following best describes your mountain bike riding habits...?
m 100% pavement m 75% pavement / 25% dirt m 50% pavement / 50% dirt m 25% pavement / 75% dirt m 100% dirt
|
Notes to Gary: At this point in the questionnaire, we need to ask respondents to rate levels within the brands, tire types, and the tread patterns. (We can't know ahead of time which levels they prefer.) This is the first section of what is called the "Priors," also known as the "self-explicated" section.
IntroACA:
During the rest of this survey, we're going to ask you to consider features of mountain bike tires that you might purchase. The tires might differ in terms of:
Brand Name: well known versus less well known brands.
Tire Type: standard versus a foam core tire. The foam core tires are not inflated with air and are therefore puncture-proof. Foam core tires come in different degrees of firmness. More firm is better for riding on pavement. Less firm is best for shock absorption and traction on off-road trails.
Tire Tread Pattern: On-road, Off-road tread, or On-road/Off-road tread. On-road tread is relatively smooth on the entire surface of the tire. Off-road tread has an aggressive pattern on the entire surface. On-road/Off-road tread has a flat narrow channel on the very bottom of the tire for a smoother ride on pavement, but aggressive tread elsewhere.
Tire Weight: from a standard weight (about 2 lbs. per tire) to double that weight (about 4 lbs. per tire).
Tread Durability: tread lasting from 1000 to 3000 miles on average.
|
Introrate:
In this section, we'll ask you to rate different features based on your preference.
You'll be shown a list of features on the left side of the screen. Use your mouse to indicate how desirable each feature is.
When making your decisions, please assume that the mountain bike tire is exactly the same in every way except for the features shown.
|
ACA Rating Task for Preference within Attributes:
<Repeat the same question for Tire Type/Firmness, and Tread Type>
Introimp:
In this next section, we want to find out how important different features are to you.
We'll ask you to indicate how important it would be for you to get the features you'd most want to have in a mountain bike tire.
We'll ask you how important the following features are:
Brand Name, Tire Type, Tire Tread Pattern, Tire Weight, and Tread Durability.
We'll be using a 7-point importance scale, where the top category is "Extremely Important". Before you start rating the importance of each attribute, you should decide ahead of time which attribute you'll give the highest score to.
|
Notes to Gary: The second stage of the "Priors" section asks respondents to state how important each attribute is. We display the best and worst levels of each attribute, and ask the respondent to tell us how important it is to get the best level of that attribute instead of the worst one. We use the answers to these questions to decide which attributes to focus on in the conjoint pairs section that follows. We should put these Importance questions on the same page, so that respondents can adjust their answers to consistently use the scale. If we placed each importance question on a separate page, then respondents might record ratings early on that they'd like to modify, given the features that were asked later.
ACA Importance Task:
< Repeat for all attributes. Show all importances on same page.>
Intropair:
By now, we have a rough idea of your opinions about the features being studied today. We still need a little more information to learn how you would decide which mountain bike tire to buy.
Based on your previous responses, we'll make up some different alternatives for you to consider. In each question we present two tires, each described by combinations of features. One is shown on the left side of the screen, and the other on the right. We'll ask you which tire you'd prefer, and to indicate your strength of preference.
We will only be asking you to compare a few features at a time. Please assume that the alternatives are identical in every other way except for the differences shown.
|
Notes to Gary: The "Pairs" section is the conjoint (trade-off) part of the ACA survey. ACA first focuses on the attributes that the respondent already stated were most important. It uses the information from the two earlier stages to construct two product alternatives (described by various combinations of attribute levels) that are nearly balanced in preference. Respondents are asked to choose between them. By varying the product profiles and observing the respondent's preferences, we are able to further refine the rough set of utilities already established in the initial Priors section. Respondents usually answer from a dozen to thirty of these conjoint questions. After each Pairs question, ACA updates its estimate of the respondent's utilities. It uses that information to generate a new challenging trade-off for the respondent to consider.
ACA Conjoint Pairs Task:
<Use 9-point scale, where 1 = "Strongly Prefer Left," 3 = "Somewhat Prefer Left," 5 = "Indifferent," 7 = "Somewhat Prefer Right," and 9 = "Strongly Prefer Right". Repeat multiple times, rotating different attribute levels to describe the tires.>
Introcalib:
This is the last section. Based on all your responses, we're making up some mountain bike tires for you to consider.
You should like the first tire least, the second one best, and any others should fall in between.
We'll ask you how likely you would be to buy each tire if it were available right now. Type a number from 0 to 100 where a "0" means that you "Definitely would not buy" and "100" means that you "Definitely would buy."
|
Notes to Gary: The last section of the ACA survey is the "Calibration Concepts." Respondents are presented usually five or six product concepts (one at a time). Respondents rate each product concept using a likelihood to buy scale. This is an optional section, and is only needed if we want to run "purchase likelihood" simulations during analysis. People often exaggerate stated purchase likelihoods, and we may conclude that competitive market simulations versus the standard inner tube tire is a better way to judge relative interest in the solid foam tires. The part-worth utilities have already been estimated before this stage. The Calibration Concepts section scales the utilities to best fit the purchase likelihood ratings.
ACA Calibration Concepts Task:
Finish:
That completes our survey. Thank you very much for your input.
|
Using Lighthouse Studio to Write the Questionnaire
Start by opening Sawtooth Software Lighthouse Studio. If you have a standard installation, you start it by clicking Start | Programs | Sawtooth Software | Sawtooth Software Lighthouse Studio. The next step is to open a new study, and define a study name.
After starting up Lighthouse Studio, choose File | New Study…. The New Lighthouse Study dialog appears, with your cursor active in the Name field.
The Location field lists the folder (directory) that Lighthouse Studio currently is using to store studies. You can use any folder you like for this tutorial project. You can browse to and create new folders by clicking the Browse... button to the right of the Location field, and then (after browsing to the folder in which you want to create a new sub-folder to contain this study) by clicking the "new folder" icon. Each studyname in Lighthouse Studio has a maximum number of twenty-four characters (either letters or numbers), and Lighthouse Studio requires that the study be located within its own folder. The folder that Lighthouse Studio automatically creates for your study also carries the same twenty-four character name as the study. For this tutorial, you might create a name such as academo1. From the New Lighthouse Study dialog, specify academo1 as the studyname.
Click the OK button. You are returned to the main menu, and a new "Study Navigator" window is displayed along the left-hand side of the screen.
As you work with this study, items appear in the Study Navigator window, listing the functional areas you have been using or that are now available to you. This list of items provides a Shortcut link to access those parts of Lighthouse Studio. Alternatively, you can access those same areas by clicking icon buttons on the toolbar or by using the pull-down menus.
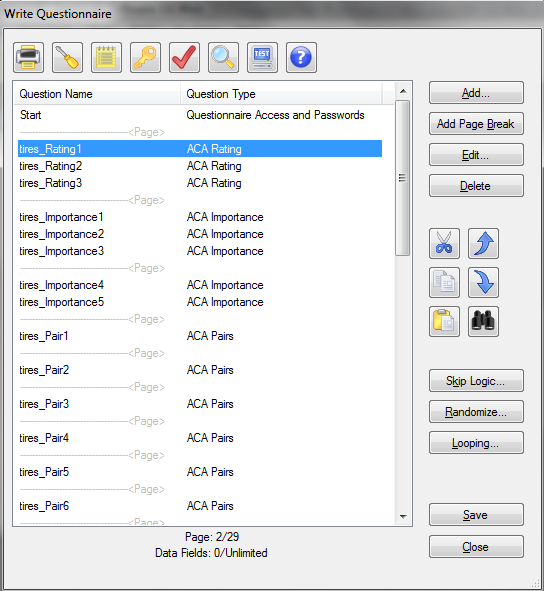
Click Compose | Write Questionnaire... to add an ACA exercise to your study. Each Lighthouse study can contain one or multiple ACA exercises. When you insert a question or a conjoint exercise within your list of questions, it is inserted directly below the question or page break you initially highlight. Highlight the page break following the Start question, and click Add.... Select ACA Exericise.
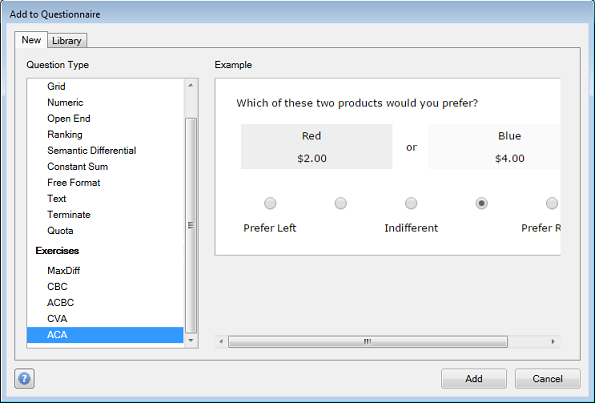
Click Add. Then, specify a name for the ACA exercise, such as tires.
Entering the List of Attributes and Levels
When composing conjoint analysis studies, one typically begins by specifying the list of attributes and levels in the software.
You use the Attributes tab of the ACA Exercise Settings dialog to enter the list of attributes and levels:
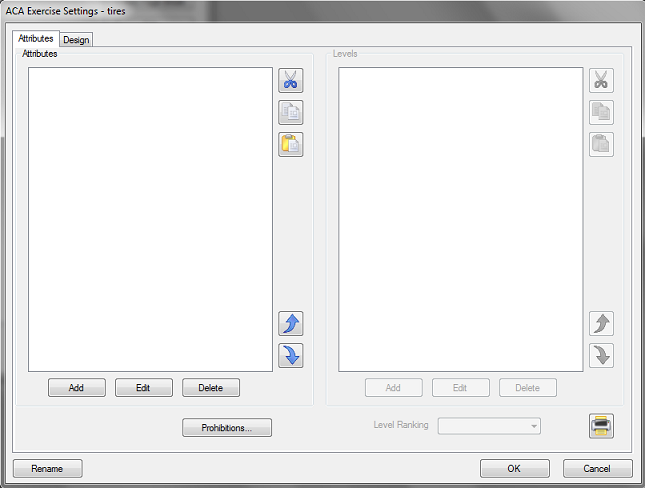
To add the first attribute, click the Add button (at the bottom left of the Attributes panel).
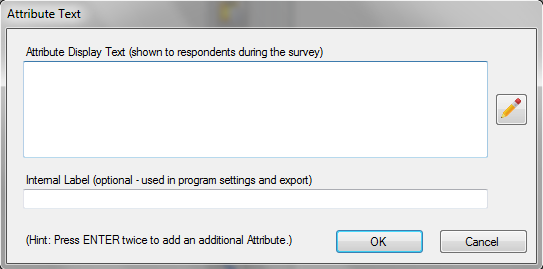
Type the first attribute name: Brand in the Attribute Display Text field. The attribute name is a label that the respondent will see in the interview. If you want to use a shorter label to display to you as the questionnaire author for program settings and data export, specify that label in the Internal Label field. If you do not specify an internal label, the label in the Attribute Display Text is used. Click OK to accept this information and close the dialog. Now that at least one attribute name is in the list, the Add button under the Levels panel becomes active. Also note that the Brand attribute is highlighted in the Attributes panel. With the Brand attribute highlighted in the Attributes panel, click the Add button under the Levels panel to add levels within the Brand attribute. The Level Text dialog is displayed. Type Michelin in the Level Display Text field. To add the next level of Brand, press the ENTER key twice. Type in the next level: Tioga. Repeat the process for the remaining level, Electra.
Back on the Specify Attributes and Levels dialog, you will notice that there is a drop-down box labeled Level Ranking. This lets you inform Lighthouse Studio about any a priori ordered attributes. Some attributes have a rational preference order (e.g. lower prices always preferred to higher prices, faster speeds preferred to slower speeds, etc.). You can avoid asking respondents to rate the levels for attributes that carry an obvious preference order by choosing Worst to Best or Best to Worst level order. This is a benefit, but be forewarned that if you misinform ACA about the correct order of preference, the resulting part-worth utilities will be terribly wrong. The current attribute, Brand, does not have an obvious preference order. You don't know ahead of time which level(s) the respondent prefers. Therefore, you should leave this attribute as No a priori ranking.
When you are ready to add the next attribute (Tire Type/Firmness), click the Add button under the left Attributes panel, type the attribute label, and click OK to place that new attribute on the attribute list. With that new attribute highlighted on the attributes list, click the Add button under the Levels panel to add the four levels of that attribute.
Follow the same pattern for the remaining attributes. For your convenience, we repeat the full list of attributes below. Note that you can copy-and-paste attribute level text from this document (and other text documents) into the text fields. After highlighting the words to copy with your mouse, use the shortcuts Ctrl-C to copy, and Ctrl-V to paste into the desired field. (Hint: you can select a list of attributes or levels from Word and paste into Lighthouse Studio using the Paste list member(s) from the clipboard icon ![]() . This can save a great deal of time.)
. This can save a great deal of time.)
Please remember to specify the Level Ranking for each attribute by highlighting each attribute in the Attributes panel and using the drop down control for each to set the Level Ranking. You should pre-specify the ranking for any attributes with rational order of preference. Make sure to specify Best to Worst ranking for Weight, and Worst to Best ranking for Tread Wear Durability. Leave the Level Ranking as No a priori ranking for the other attributes.
Brand Name
Michelin
Tioga
Electra
Tire Type/Firmness
Puncture-proof solid foam core. Very firm (best for pavement)
Puncture-proof solid foam core. Somewhat firm (for pavement or dirt)
Puncture-proof solid foam core. Less firm (for best traction in dirt)
Standard inner tube tire. Adjustable firmness (for pavement or dirt)
Tread Type
Off-road tread
On-road tread
On-road / Off-road tread
Weight
Tire weight: 2 lbs. (about same as regular tire)
Tire weight: 3 lbs. (50% more than regular tire)
Tire weight: 4 lbs. (double the weight of regular tire)
Tread Wear Durability
Tread lasts for 1000 miles
Tread lasts for 2000 miles
Tread lasts for 3000 miles
After you have specified the list of attributes and levels, you are ready to set up your ACA questions. To do so, select the Design tab.

Four main areas appear on this dialog: Priors Randomization, Importance Settings, Pairs Settings, and Calibration Settings. It may help to review some terms that describe the different sections of the ACA survey:
Priors (the self-explicated level ratings and attribute importances.)
Pairs (the conjoint section of the interview. Pairs of products defined on multiple levels are displayed, and respondents indicate the one they prefer, using a rating scale running from left to right.)
Calibration (an optional section called Calibration Concepts used when you need to run purchase likelihood market simulations. Respondents rate a few product concepts individually on a likelihood of buying scale.)
Let's begin thinking about the Priors. Before showing any conjoint questions, we need to ask respondents to rate the levels within any attributes that we don't know ahead of time the rational preference order. For example, brand name, tire type, and tread type. We also specify control settings regarding the attribute importance question that follows the level ratings. The Priors Randomization area (with the suggested settings for this questionnaire) is shown below.
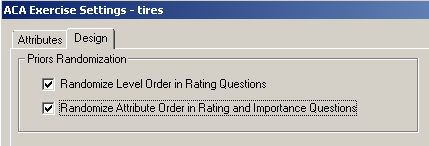
We suggest you randomize the order of the levels displayed on the screen and the order of the attribute presentation for the importance questions. Check the Randomize Level Order in Rating Questions and Randomize Attribute Order in Rating and Importance Questions boxes. These settings will help control for any psychological order bias.
Next, let's move to the Pairs Settings area of this dialog. The Pairs represent the conjoint section of the interview. Pairs of products defined on multiple levels are displayed, and respondents indicate the one they prefer, using a rating scale running from left to right. Rather than take the space within this tutorial to explain the settings, we refer you to the context-sensitive help provided by typing F1. For this Mountain Bike Tires tutorial, we suggest the following settings:
Maximum attributes for Pairs Section 5
Number of Pairs questions 20
Number of Pairs questions at
each stage 10
Number of attributes in each
pairs question in the first stage 2
Number of attributes in each
pairs question in the last stage 3
We suggest including all 5 attributes in the Pairs section (Maximum attributes for Pairs Section = 5). Even though the number of pairs suggested by ACA's formula applied to this particular list of attributes and levels (explained when you press F1 for help) is just 14, you may decide that your respondents can reliably answer a few more. More Pairs information is good to have (particularly with studies that have small sample sizes), as long as respondents don't become so fatigued that they give poor quality data or drop out of the survey. You decide for the mountain bike tire study that respondents can reasonably complete 20 pairs. Larger studies with more attributes may lead you to require respondents to answer more questions, though most researchers don't ask respondent many more than about 30 Pairs questions. (See an article entitled "Accuracy of Utility Estimation in ACA" in the Technical Papers Library at http://www.sawtoothsoftware.com/support/technical-papers for more information about how the number of pairs questions affects the precision of part-worth utility estimates.)
Let's turn to the Calibration Settings area of this dialog. This is an optional section that you might decide to drop. With the Calibration Concepts section gone, this is another justification for increasing the number of Pairs questions from the "suggested" 14 for this particular set of attributes and levels to 20. If you need to use Purchase Likelihood simulations during analysis, then you must include a Calibration Concepts section. We'll include it in this tutorial so that you can have practice setting up a Calibration Concept section. Set these two fields to:
Number of Calibration Concepts = 5
Number of attributes in each concept = 5.
Close the ACA Exercise Settings by clicking OK. Lighthouse Studio automatically places the ACA questions into your survey:
Lighthouse Studio has added a number of ACA related questions to the survey. These questions are based on your settings and the default template.
Before we examine or fine tune those ACA questions, let's turn our attention to the issue of assigning passwords for respondents to enter at the opening screen of a Lighthouse survey.
Passwords and the Start Screen
Placing a survey on the web makes it convenient for a geographically dispersed population to take surveys. However, the danger is that the survey may become available to people that have not been invited to take the survey. Also, some respondents might try to take the survey multiple times. Assigning respondent passwords is a way to deal with both of these issues. Password assignment is beyond the scope of this tutorial, so to make things simple we'll assume that no passwords are to be used.
The Start screen is placed as the first page in your questionnaire, whether you are using passwords or not. If you are using passwords, it is the page in which respondents type passwords to access the survey. If not using passwords, you'll use this screen to specify any introductory/welcome text.
Let's enter the introductory text into the Start screen using the Write Questionnaire dialog. You can access the Write Questionnaire dialog by selecting Compose | Write Questionnaire… or by clicking the "pencil" icon ![]() on the toolbar.
on the toolbar.
The introductory text and other survey questions would most likely be initially developed within a word processing document. Assuming you really had such a document, you might use the Ctrl-C to copy, and the Ctrl-V shortcuts to paste the information into Lighthouse Studio. We suggest you simply copy-and-paste the text within this document into your survey questions rather than re-type the text (if viewing this document with Acrobat Reader, you can use the "text select" icon ![]() from the Acrobat Reader toolbar.)
from the Acrobat Reader toolbar.)
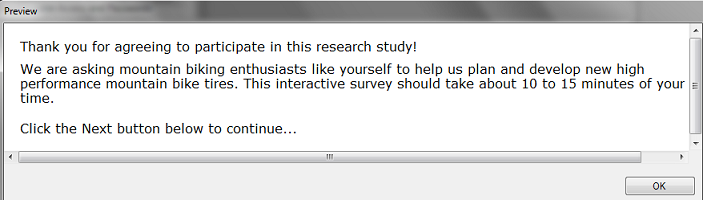
The introductory screen is as follows:
Start:
Thank you for agreeing to participate in this research study!
We are asking mountain biking enthusiasts like yourself to help us plan and develop new high performance mountain bike tires. This interactive survey should take about 10 to 15 minutes of your time.
Click the Next button below to continue... |
We'll insert this introductory screen in the Start question that is automatically the first question of any Lighthouse survey. From the Write Questionnaire dialog open the Start question by highlighting it in the list of questions and clicking Edit.... Alternatively, you can double-click the Start question, and it automatically opens. The Questionnaire Access and Passwords dialog is displayed::
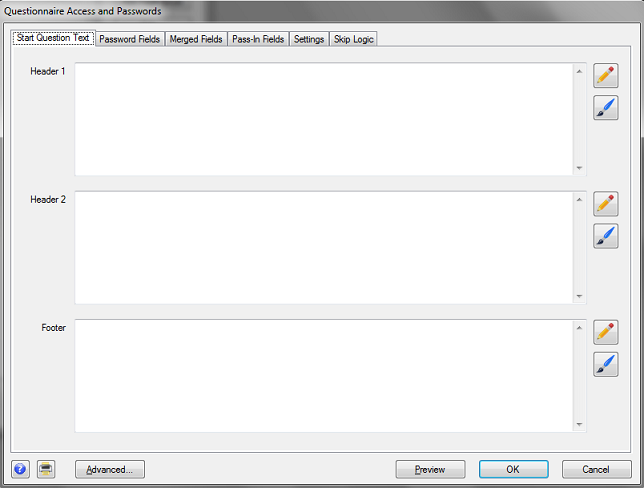
Most question types have "Header 1", "Header 2," "Body" and "Footer" sections. (The Start question has all but the "Body" section.) These are "text" areas in which you can insert any text (including HTML). When the question is viewed with a web browser, the sections are organized roughly as follows:

For this introductory screen (that includes three paragraphs of information), it seems to make sense to place the first paragraph in the "Header 1" area, the second paragraph in the "Header 2" area, and the third paragraph in the "Footer" area.
Type (or cut and paste) the following text for the Start question into the text areas in the Start question. Put the first paragraph in Header 1, the second paragraph in Header 2, and the third paragraph in Footer.
Thank you for agreeing to participate in this research study!
We are asking mountain biking enthusiasts like yourself to help us plan and develop new high performance mountain bike tires. This interactive survey should take about 10 to 15 minutes of your time.
Click the Next button below to continue...
The main dialog only shows a portion of the text, but you can click the "pencil" icon ![]() adjacent to each text area to expand the text editing window.
adjacent to each text area to expand the text editing window.
To preview how the question will look when it runs on the respondent's computer using Windows Explorer, click the Preview button. The question is displayed in "Preview" mode (no data are saved, and no special "error checking" or "validation" is performed for the question).
Lighthouse Studio automatically places paragraph breaks (extra blank lines) between the Header 1, Header 2, and Footer sections. If you put all the text in a single section, you may see that when the web browser interprets the text, it all runs together without any blank lines between the paragraphs (unless you insert some HTML instructions to force blank lines between paragraphs). We'll talk about using HTML within your text to take greater control over the layout, font, and style later in this unit.
Click the OK button of the Preview window to close that window and return to the previous Lighthouse dialog.
After viewing the text in preview mode, you might decide that it is really too small, or that you want to make the text bold. By default, the font appearance and color schemes are based on the Style selected for your project (Compose | Survey Settings, Style tab). You can try different styles to see how it affects the appearance of the questionnaire. You can also override the text and color settings in the Style by clicking the Paintbrush icon ![]() and specifying new settings to override the appearance of this question
and specifying new settings to override the appearance of this question
After you are happy with the layout of the introductory screen, click OK to return to the Write Questionnaire dialog. Because we aren't using respondent passwords, we'll ignore the additional tabs on the Questionnaire Access and Passwords dialog.
Specifying Select Questions
(If you are already familiar with adding Select questions within your surveys, you may choose to skip forward to the section entitled "Fine-Tuning the ACA Questions").
When you add a new question to the List of Questions, it is inserted directly below the question that was highlighted when you clicked the Add... button. If you need to move a question once it has been added to the List of Questions, simply highlight the question to be moved and click the ![]() or
or ![]() buttons to move the questions within the list (you can also highlight a question and click Ctrl-X or Ctrl-C to cut or copy and Ctrl-V to paste questions within the current questionnaire, or even to another Lighthouse study.)
buttons to move the questions within the list (you can also highlight a question and click Ctrl-X or Ctrl-C to cut or copy and Ctrl-V to paste questions within the current questionnaire, or even to another Lighthouse study.)
Now you are ready to specify the first Select-Type question:
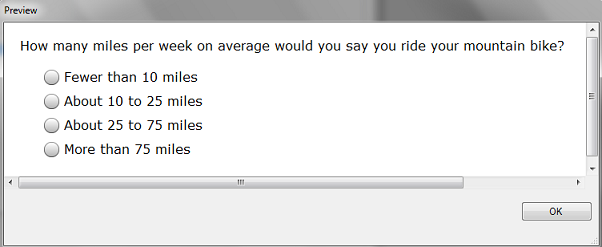
Miles:
How many miles per week on average would you say you ride your mountain bike? m Fewer than 10 miles m About 10 to 25 miles m About 25 to 75 miles m More than 75 miles
|
First, make sure that you highlight the page break directly beneath the Start question on the List of Questions (when you add a new question, it is placed directly below the highlighted question/page break on the list). At the Write Questionnaire dialog, click Add..., choose Select as the question type, and type Miles for the question name. Click OK and the Select Question dialog is shown.
Place the heading text for the question in the Header 1 field. To specify the response options, click the Response Options tab. From the Response Options tab, use the Add... button to add the four response options for this question. When you are finished, the question should look something like:
Now that you have seen how to specify Single Select question types, you have the tools you need to specify the remaining two select-type questions for the mountain bike tires questionnaire (Triptype and Terrain—please refer to the questionnaire text for these questions as presented near the front of this unit).
Formatting Text in Lighthouse Studio Questions
In addition to the Select questions we just added to the questionnaire, there are some text-only, instructional screens to add. Referring to the questionnaire we outlined earlier, these "questions" are named IntroACA, Introrate, Introimp, Intropair, Introcalib, and Finish. Even though the respondents aren't asked to provide specific inputs to these, we refer to these as "questions" in the sense that we add them to the questionnaire as if they were standard questions, and they are listed separately by their "question" name in the List of Questions. Such questions are called Text questions.
After the Terrain select-type question, follows the text-only instructions:
IntroACA:
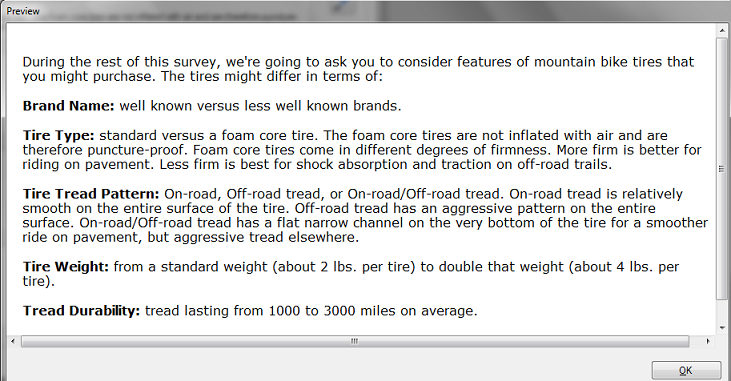
During the rest of this survey, we're going to ask you to consider features of mountain bike tires that you might purchase. The tires might differ in terms of:
Brand Name: well known versus less well known brands.
Tire Type: standard versus a foam core tire. The foam core tires are not inflated with air and are therefore puncture-proof. Foam core tires come in different degrees of firmness. More firm is better for riding on pavement. Less firm is best for shock absorption and traction on off-road trails.
Tire Tread Pattern: On-road, Off-road tread, or On-road/Off-road tread. On-road tread is relatively smooth on the entire surface of the tire. Off-road tread has an aggressive pattern on the entire surface. On-road/Off-road tread has a flat narrow channel on the very bottom of the tire for a smoother ride on pavement, but aggressive tread elsewhere.
Tire Weight: from a standard weight (about 2 lbs. per tire) to double that weight (about 4 lbs. per tire).
Tread Durability: tread lasting from 1000 to 3000 miles on average.
|
This text layout is a bit more challenging than we dealt with before (when we put three paragraphs of introductory text into the Start question). There are more than three separate paragraphs here, and we'll need to deal with the additional element of bolding selected text.
Add a Text question directly following the Terrain question in the questionnaire. To do so, highlight the Terrain question, click Add…, and specify the Question Name as IntroACA and the question type as Text. The Text dialog is displayed.
Earlier in this tutorial, when we created the Start, we placed each paragraph of text in a separate Header 1, Header 2, or Footer section. We saw that Lighthouse Studio automatically places blank lines between text in these sections. However, with the text in the IntroACA question, there are many more paragraph breaks. We'll take the opportunity here to introduce the concept of using a few simple HTML instructions within our survey text.
HTML stands for "HyperText Markup Language" and provides simple ways for you to enhance the look of your surveys, such as by bolding or underlining words, or making paragraph breaks within text. Browsers know how to interpret HTML instructions when displaying the results to the screen. If you know HTML, you can use it whenever you wish within your surveys to accomplish your aims. If you don't know HTML, it isn't very difficult to learn a few HTML tricks, or you can use the toolbar available within the editor that appears when you click the "Pencil" icons ![]() :
:

Either type or cut-and-paste the text for the IntroACA question into the Header 1 text field (Any of the other three fields could be used also, though the Body field is indented). Click the "Pencil" icon to display the larger text editing window. Initially, the text appears something like this:
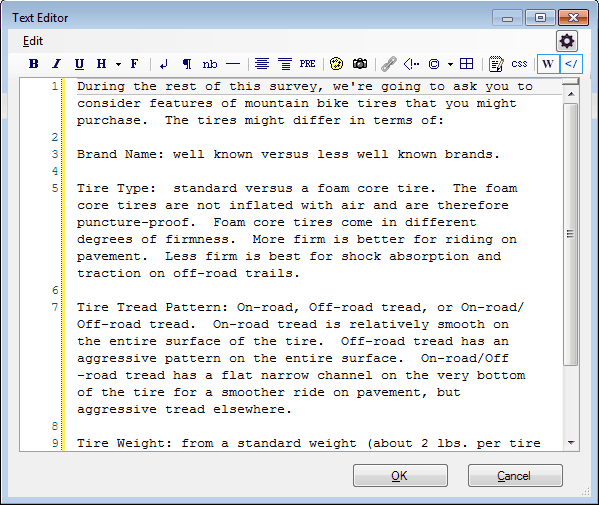
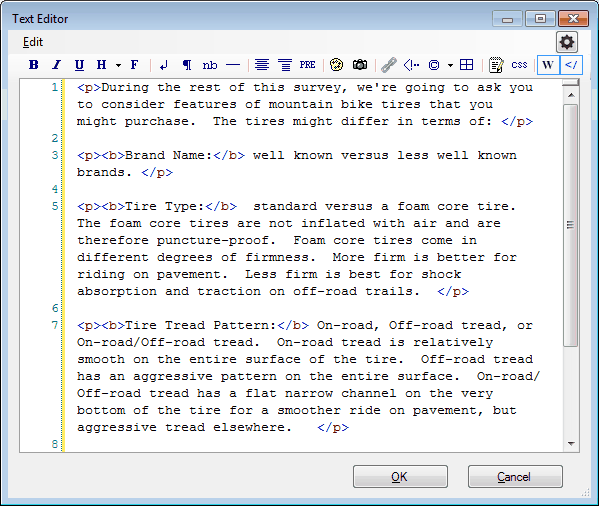
Even though it appears that there are extra blank lines between the paragraphs, web browsers ignore these hard returns (as well as more than one consecutive space characters), so you'll need to provide HTML instructions to insert these paragraph breaks (hard return plus blank line). HTML instructions are placed within <> brackets, called "tags." For example, the HTML instruction to create a paragraph break begins with an "open" paragraph tag written as <p> and optionally ends with a "close" paragraph tag written as </p>. The text to be formatted as a separate paragraph is enclosed within these tags. You can either directly type HTML within your document, or you can highlight text to be modified and click the icons on the HTML toolbar in the editor. If you highlight the first paragraph with your mouse:
During the rest of this survey, we're going to ask you to consider features of mountain bike tires that you might purchase. The tires might differ in terms of:
And then (with the text in the first paragraph highlighted), click the "Paragraph" icon ![]() on the toolbar. This inserts a <p> prior to the text and a </p> after the text:
on the toolbar. This inserts a <p> prior to the text and a </p> after the text:
<p>During the rest of this survey, we're going to ask you to consider features of mountain bike tires that you might purchase. The tires might differ in terms of:</p>
When the browser interprets this text, it doesn't display the "tags" but instead separates the text enclosed within the tags as a separate paragraph. Repeat the same for each of the paragraphs in the IntroACA question.
Next, we need to bold certain words in the text. The HTML tags for bolding text are <b></b> (with the text to be bolded placed between the open and close bold tags). You can either directly type these tags within the document, or highlight the text to be bolded with the mouse and click the "Bold" icon ![]() on the toolbar. After you finish separating the paragraphs with <p></p> tags and bolding the appropriate text with <b></b> tags, it should look something like:
on the toolbar. After you finish separating the paragraphs with <p></p> tags and bolding the appropriate text with <b></b> tags, it should look something like:
Click OK to return to the Text dialog and then Preview to see how the web browser displays this question. It should look like:
You should now have the tools necessary to add the other Text questions in their appropriate positions in the survey: Introrate, Introimp, Intropair, and Introcalib (Finish is a Terminate question, explained in the next paragraph). Remember to place Introrate directly prior to the tires_Rating1 question, Introimp directly prior to the tires_Importance1 question, Intropair directly prior to the tires_Pair1 question, and Introcalib directly prior to the tires_Calibration1 question.
Make sure when adding the Finish question at the end of the survey to add it as a Terminate question type. On the Settings tab of the Terminate question, click Terminate Respondent to indicate that respondents that reach this question are finished. Lighthouse Studio may warn you that a terminating question must stand alone on its own "page" in the survey. This leads us into our next discussion on page layout.
Page Layout and Study Settings
It may be helpful at this point to review how Lighthouse breaks the survey into separate pages, and some basic global settings that affect the look and functionality of your questionnaire. The Write Questionnaire dialog also displays the page breaks that may be currently set for your questionnaire.
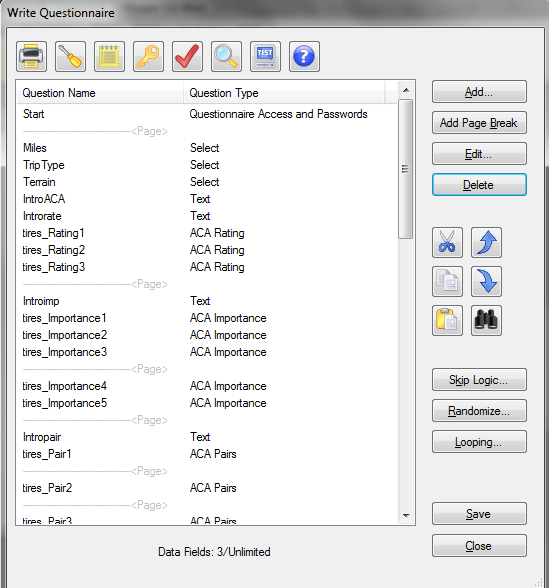
This dialog shows how the various questions we've specified (or that Lighthouse has automatically added to the list) are arranged across different pages. Page breaks are indicated by "---------------<Page>". Notice that the Select questions we've added to the questionnaire are all currently arranged on the same page. Let's assume we wanted to break these up, one question per page. You set a new page break after the Miles question by highlighting Miles on the list and clicking the Add Page Break button. Miles is now placed on its own page. Repeat this operation to place Terrain, IntroACA, and Introrate on separate pages. Delete the page break between tires_Importance3 and tires_Importance4 to place all the Importance questions on the same page. Make sure to place the final text screen Finish on its own (last) page.
From the Write Questionnaire dialog, click the Survey Settings icon ![]() (alternatively, click Compose | Survey Settings...). This dialog controls global aspects of the questionnaire (meaning that the settings here control the general behavior of the questionnaire rather than page- or question-specific aspects.) Examples include the fonts and colors used in the questionnaire, the wording for the "Next" button, and the global header and footer that can appear at the top or bottom of each page of the survey. The details of this dialog are beyond the scope of this unit, but you can learn more about the items on the dialog by pressing the F1 key.
(alternatively, click Compose | Survey Settings...). This dialog controls global aspects of the questionnaire (meaning that the settings here control the general behavior of the questionnaire rather than page- or question-specific aspects.) Examples include the fonts and colors used in the questionnaire, the wording for the "Next" button, and the global header and footer that can appear at the top or bottom of each page of the survey. The details of this dialog are beyond the scope of this unit, but you can learn more about the items on the dialog by pressing the F1 key.
Fine-Tuning the ACA Questions
After you have finished these steps, your questionnaire should be complete (though it may lack polish).
You will note that Lighthouse used a set of default names to represent the many ACA questions in the questions list. Lighthouse built those questions drawing from a default template. Some of the text for the questions you will certainly want to edit to fit the appropriate wording for your study. Depending on how picky you are about the look of your survey, you could spend a good deal of time adjusting each question and adding HTML elements to achieve just the right look.
Let's view one question from each ACA section, as an introduction to fine-tuning ACA questionnaires.
The first section in ACA is the "Ratings" section, where respondents are asked to rate any levels within attributes for which we don't know ahead of time the order of preference (levels for attributes such as brand or color). From the List of Questions in the Write Questionnaire dialog, highlight and edit the tires_Rating1 question (note that there are only three Ratings questions: one for each attribute for which we haven't assumed a Level Ranking (a priori) order.
Click Preview and one of the level rating questions is displayed (due to randomization, the attribute shown and also the order of the levels may be different):
Note that Lighthouse automatically "fills in" the attribute name ("Weight", in this example) in the text, and places the levels at the left-side of the grid. If you close this window and view the text in the Header 2 text field (using the "Pencil" icon is easier), you'll see that the source text for the question header is:
Please rate the following [%ACAAttribute()%]s <br> in terms of how desirable they are.
Notice that Lighthouse Studio uses a "system function" called ACAAttribute( ) (delimited by [%...%] ) to fill in the text you supplied for the attribute name for attribute 1. This makes it easier to compose ACA surveys, as the text you supply for the attribute names is automatically carried forward in this section of the questionnaire. Of course, you may find that the text you used doesn't lead to very proper grammar when inserted this way within the template sentence. In that case, you can modify the wording as you like. However, recognize that you only supply the text once for each major section in ACA, and this same text is used across all questions in that section. So, the text must be generic enough to be meaningful across all questions in the section.
Also note the use of the <br> tag, which instructs the browser to insert a line break at that point.
Hint: If you want to customize the text directly above or below any ACA question, you can insert a new Text question intermingled within the questions in the ACA section (you can also insert other question types mid-stream within an ACA segment should you be inclined). Make sure to format the page breaks from the Write Questionnaire dialog so that the new customized text you've inserted appears properly within the separate pages of the ACA questionnaire.
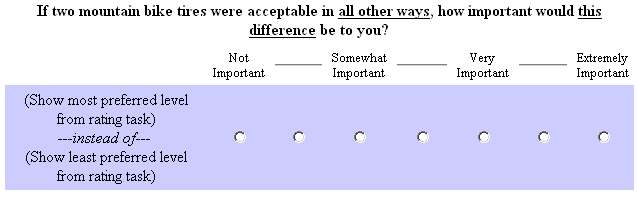
From the Write Questionnaire dialog, highlight the tires_Importance1 question and click Edit…. This is the Importance question in ACA, where respondents are shown the best and worst levels from each attribute and are asked to rate the contrast in those two levels in terms of importance. Click Preview, and the following is displayed (depending on your attribute randomization, you may see a different attribute):
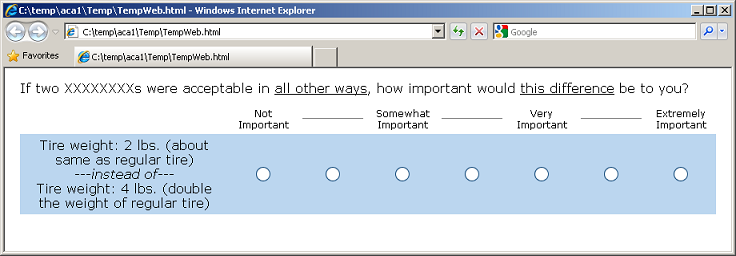
Note that you'll need to edit the "XXXXXXXX" characters to be appropriate for the subject of your survey ("mountain bike tires" would be appropriate here). To do this, return to the ACA Importance Questions dialog and edit the text directly within the Header 2 text field. Also note the use of two System Functions (%ACABest( ) and %ACAWorst( )) within this question that dynamically return each respondent's most preferred and least preferred levels (based on the answers provided in the earlier ACARAT questions or based on your previous Level Ranking setting for attributes.
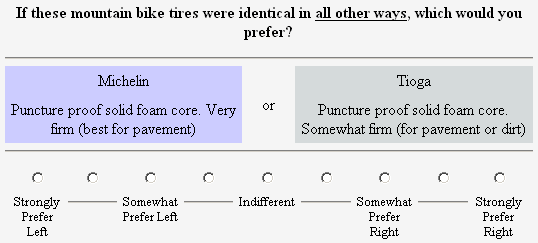
When you edit the tires_Pair1 question and preview it, the following is displayed:
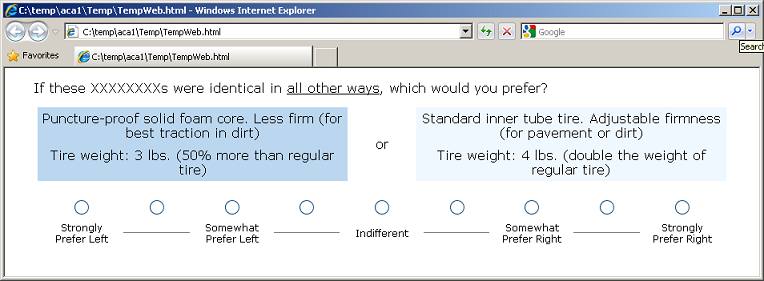
Again, you need to edit the "XXXXXXXX" characters to be appropriate for your survey.
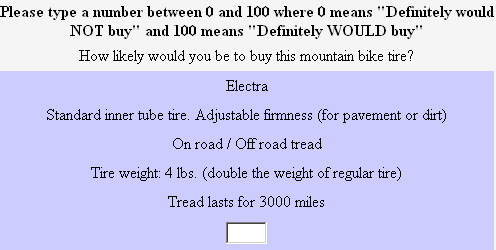
Finally, when you edit and display the tires_Calibration1 question, its default presentation is:
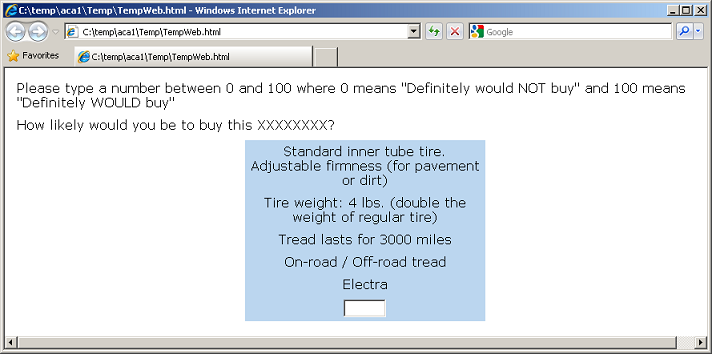
Again, you'll need to edit the "XXXXXXXX" to be appropriate.
Adding Polish and Style
You have probably noted that the survey we've created is pretty bland looking. We can add some polish and style by clicking the Survey Settings icon ![]() from the Write Questionnaire dialog (or by clicking Compose | Survey Settings from the main menu).
from the Write Questionnaire dialog (or by clicking Compose | Survey Settings from the main menu).
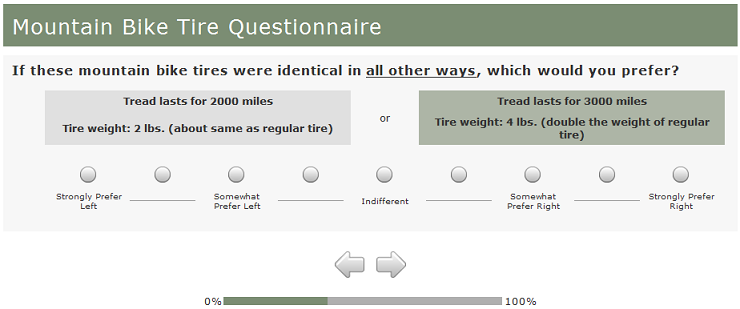
First, let's select a style from the Styles tab. Select a style you wish to use, and click Use Selected at the bottom of the dialog to implement the style. We'll select Panama as the style, but you might want to experiment with other styles.
On the General Settings tab, you can select to use graphical Submit, Previous, and Select/Checkbox buttons. A library of buttons is provided, available in the C:\Program Files\Sawtooth Software\Lighthouse\graphics folder.
On the Headers and Footers tab, you can specify a Header and a Footer. We'll specify Mountain Bike Tire Questionnaire as the header text.
The Progress Bar tab lets you add a progress bar to your survey. We'll click the check box to add a progress bar to the page footer.
When you go back and test run the survey, your survey should have a bit more polish. Under Panama style (and by selecting graphical Previous and Next buttons), our survey now looks like:
Test Running Your Survey Using "Local Test Server"
Although the Preview Survey function is nice, you generally will want to test your survey in runtime mode, with any skip patterns, response verification, and randomizations in place. You could upload your files and the Perl scripts to the Web Server, but Lighthouse Studio provides a more convenient way to test run your survey locally on your PC or laptop.
When Lighthouse Studio was installed on your computer, web server software called "Apache" was also installed. Apache lets your computer run the questionnaire just like a remote Web Server would.
Local Test Server
From the Write Questionnaire dialog, Click the Test Survey button ![]() .
.
Your browser opens up the first survey page. This is your survey, as it would appear to a respondent over the Internet (there are slight visual differences from browser to browser).
To close the survey, simply close the browser window (using the X in the upper-right hand corner). To run the survey again, click the Test Survey button ![]() .
.
After you have edited the survey to the point that you are pleased with the look, content, and functionality of your survey, you should do some careful testing to ensure you haven't made a fundamental error in your ACA setup. We suggest you take the survey yourself under Local Test Server. You should answer each question legitimately and carefully. Pay special attention to the ACA questions to make sure that the attribute levels appear correctly: the most preferred levels should always appear above the least preferred levels in the Importance questions. The Pairs questions should generally not pose "obvious" trade-offs (all the levels on the left better than the ones on the right, or vice-versa). All the worst levels should appear together within the first Calibration Concept, and the best levels in the second Calibration Concept. If the importance questions, Pairs, or Calibration Concepts are not appearing correctly, this suggests that the Level Ranking (a priori) order settings are incorrect for some attributes. You must be vigilant to avoid this error. Even experienced ACA researchers have been known to set a Level Ranking order incorrectly when rushed.
After you have taken the questionnaire carefully as suggested above, you should download the data (downloading data is described in a separate tutorial called "Getting Started with Lighthouse Studio: A 45-minute Hands-On Tour"), then compute and examine your part-worth utilities using the market simulator (described later). The part-worths should very closely reflect your preferences. If they don't, this suggests something may be wrong with your study setup. Generally the most common error is that you have not correctly set an ordered attribute as Best to Worst or Worst to Best. Such errors are disastrous, so double or even triple-check your attribute settings.
After you are convinced that the survey is functioning properly, you should also pretest your survey among your colleagues. They can give you feedback regarding the usability of the survey, and you can examine the resulting part-worths to make sure the data at least have face validity.
Pretesting and Fielding
Let's now return to the marketing problem and story we began at the beginning of this document.
After you have tested the survey using the Local Test Server, you post the survey to your web server, using Sawtooth Software's hosting service, or using an web server set up for you by an ISP (Internet Service Provider). (Setting up your survey on the web is beyond the scope of this unit, but is described in detail elsewhere. Fielding options also include hosting on your own company's server, or using Sawtooth Software's hosting service). You send an email to Gary, with a link to your survey, and he browses to and takes the survey. He suggests some minor wording changes. After you make those changes, Gary invites six other individuals at Electra take the survey. You download the data and analyze. Due to the small sample size, the results are a bit noisy (and there is an obvious bias toward the Electra brand name), but the data seem to feel right.
Next, you recruit six mountain biking enthusiasts within your city to come to a central site to see a demonstration of the new foam tire technology and take the survey. After a short hands-on demonstration of the new foam core tires, they sit down to computers connected to the Web and take the survey. You and Gary watch silently as they take the survey. At the end of each session, you ask each respondent follow-up questions to ensure that there weren't any parts that were difficult to understand or just didn't make sense. You ask them specifically about the ACA sections, making sure that they understood what to do at each stage of the survey, and that they didn't feel overwhelmed by the task. After debriefing the test respondents and analyzing their data to ensure that the results look reasonable, you make a few small adjustments and proceed to field.
Thirty respondents are brought to the field facility, shown the solid foam tire prototype, and complete the survey. The completed data reside on Sawtooth Software's hosting service servers. The details for viewing and downloading the data from the server are provided in other areas of the documentation and are beyond the scope of this ACA unit. Even so, it is useful to at least describe the steps you would perform to access and download the data from the Web, estimate the part-worth utilities, and begin analysis using the market simulator.
Data Management, Utility Estimation
Lighthouse Studio includes an Admin Module so that you can monitor or access your project from any computer connected to the Web. The Admin Module is password protected, and your passwords for access are specified on the Field | Hosting Management dialog. Lighthouse Studio generates random administrative access passwords whenever you create a new study, but you can modify them to suit your needs.
To download the data from the 30 respondents to the mountain bike tires study, you can browse to the administrative module for your study on the web site (again, we are speaking hypothetically, as for this tutorial study there is no such site set up). Once at the Admin Module, you would download your data (by clicking Download from the main menu), making sure to save your data file to the same folder on your hard drive in which you developed the Lighthouse project. Alternatively, from the Lighthouse interface, you can simply click Field | Get Data to download your data without logging into the Admin Module.
Once you have downloaded the data, you are ready to estimate part-worths. Assuming you had downloaded the data as described above, you would click Analysis | Analysis Manager, specify OLS as the Analysis Type, then click Run. Computation takes just a few seconds. If you try this with this tutorial study, you will receive an error stating that you have no data within your project folder to analyze.
We'll proceed assuming you had data for this project and show you what the utility report would look like.
Scenario:
Utility Run: ACA Utility Run
Average Utility Values
Rescaling Method: Zero-Centered Diffs
Total Respondents 30
Michelin 4.73
Tioga 18.14
Electra -22.88
Puncture-proof... Very firm... -6.62
Puncture-proof... Somewhat firm... 4.60
Puncture-proof... Less firm... -21.91
Standard inner tube tire... 23.94
Off-road tread -20.16
On-road tread 1.14
On-road / Off-road tread 19.02
Tire weight: 2 lbs... 62.51
Tire weight: 3 lbs... 8.94
Tire weight: 4 lbs... -71.45
Tread lasts for 1000 miles -37.17
Tread lasts for 2000 miles -2.14
Tread lasts for 3000 miles 39.31
Average Importances
Brand Name 13.99
Tire Type/Firmness 19.98
Tread Type 22.44
Weight 27.22
Tread Wear Durability 16.37
Total Respondents 30
<<The above average utilities are rescaled utilities using the zero-centered "diffs" method. The diffs method rescales utilities so that for each individual the total sum of the utility differences between the worst and best levels of each attribute across attributes is equal to the number of attributes times 100.>>
It is very important that you learn how to interpret part-worth utilities properly. Please see a document entitled "Interpreting Conjoint Analysis Data" available in our Technical Papers library at http://www.sawtoothsoftware.com/support/technical-papers.
It is difficult to make firm conclusions from just these thirty respondents, but we might try to form some tentative conclusions:
First, looking just at the report of average importances (the second section above), it appears that the most important thing to respondents is the weight of the tire. This confirms some of Gary's concerns and implies that Electra should pay attention to controlling the weight of the solid core tires. The least important attribute is brand, which is good news if Electra wants to break into this market without an established name.
Paying attention to the Average Utility Values report, Electra seems less preferred than the other two brands (no surprise there). On average, most respondents seem to prefer standard tires to the new technology. It looks like there might be a slight inclination toward a hybrid (On-road/Off-road) tread. There appears to be significant resistance in increasing tire weight, particularly from 3 to 4 lbs.
A lot of important effects due to the competitive context, respondent heterogeneity and correlations of preferences among attribute levels can occur within a data set. These may be completely obscured by viewing just average utilities and importances. Also, the concept of utility scores seems difficult to grasp for many managers. For these reasons, running market simulations offers a more powerful and revealing way to look at conjoint data.
For more information about how to conduct market simulations and use the choice simulator integrated within Lighthouse Studio, we recommend you view the final sections of the CBC Tutorial.