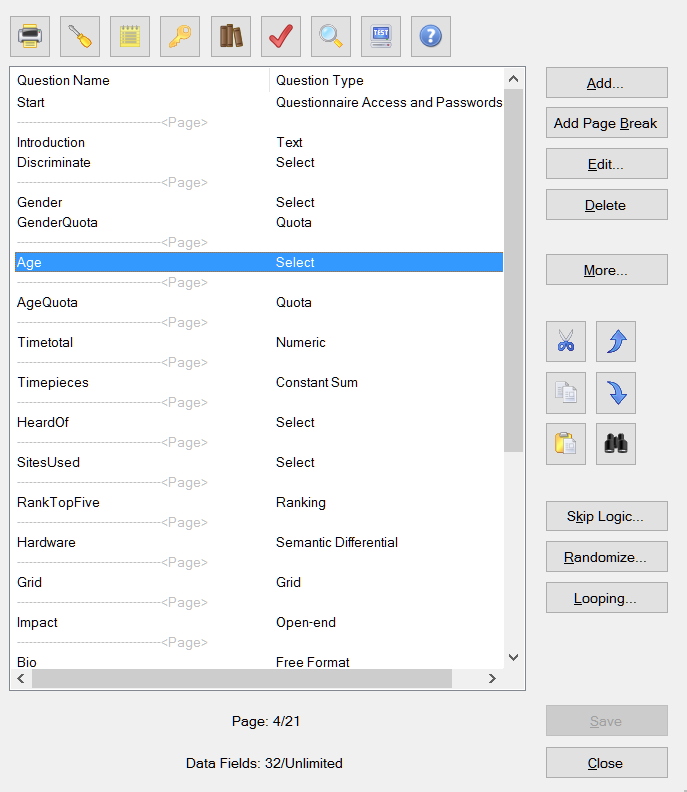
When you click Compose | Write Questionnaire, the Write Questionnaire dialog is displayed:

This dialog is the main workhorse within Lighthouse Studio. It provides a list of the current questions in your study, shows question types for each and has many buttons that lead to other useful functions. You add questions to your project using the Add... button, which leads to the Add to Questionnaire dialog that lets you specify the question name and type. When you highlight a question on the list, the page number this question appears on is shown in the footer of the dialog.
When you right-click a question name, a menu appears that include many of the options shown on the dialog above.
Re-ordering Questions
You can re-order questions within the list by highlighting them and clicking the Up Arrow and Down Arrow icons directly at the right of the questions list. You can also re-order questions by cutting and pasting questions to a new location (see next section for further details).
Cutting/Copying Questions within and across Studies
You can cut or copy questions within the same study, or to another Lighthouse study. To copy questions, highlight a single or multiple questions (by holding down the Ctrl or Shift keys while selecting with the mouse) and click the Copy button ![]() (or press Ctrl + C). The question(s) are stored in the buffer. Then, place your curser within the current question list or in the question list for another Lighthouse study (you may open another Lighthouse study within another instance of Lighthouse Studio). Click the Paste button
(or press Ctrl + C). The question(s) are stored in the buffer. Then, place your curser within the current question list or in the question list for another Lighthouse study (you may open another Lighthouse study within another instance of Lighthouse Studio). Click the Paste button ![]() (or press Ctrl + V) and a copy of those question(s) are pasted into the target questionnaire. The questions are automatically renamed to resolve duplicate labels, by incrementing a number at the end of the question name.
(or press Ctrl + V) and a copy of those question(s) are pasted into the target questionnaire. The questions are automatically renamed to resolve duplicate labels, by incrementing a number at the end of the question name.
Add...
Adds a new question directly following the question that is currently highlighted in the List of Questions.
Add Page Break
Adds a page break directly following the question that is currently highlighted in the List of Questions.
Edit...
Edits (lets you modify) the question that is currently highlighted in the List of Questions. You can also double-click a question within the list to edit.
Delete
Deletes the question that is currently highlighted in the List of Questions.
Skip Logic...
Leads you to a dialog in which you can specify skip logic, to control the flow of the questionnaire.
Randomize...
Lets you add randomization of pages or questions on a page.
Looping...
Lets you ask a question or series of questions multiple times, for each member of a list.
Save
Saves the current changes to your study.
Close
Closes this dialog.
![]() Print...
Print...
Prints a copy of the question list, along with the number of data fields used in each question.
![]() Survey Settings...
Survey Settings...
Leads you to a dialog in which you can specify a number of global settings that control the look and functionality of your survey, including fonts, global styles, colors, and global headers and footers.
![]() Lists...
Lists...
Accesses the List Manager, for managing lists of items used in questions.
![]() Questionnaire Access and Passwords...
Questionnaire Access and Passwords...
Lets you add respondent passwords, or respondent data to be merged with the dataset once a respondent enters the survey. Also lets you specify variables to be "passed in" (via the URL) when the respondent clicks a link to access the survey.
![]() Check for Errors...
Check for Errors...
Checks your questionnaire for logical and other errors.
![]() Preview...
Preview...
This option lets you preview how your questionnaire looks when it is posted on your web server. When you click this button, you can select whether to view the entire questionnaire, the highlighted question(s) on the list, or the entire page containing the highlighted question.
If you want to share a printed copy of survey with colleagues, you'll want to use the File | Print Study functionality rather than Preview....
![]() Test the Survey Locally...
Test the Survey Locally...
Uses the local test server to test your survey. Uses your default browser to display the questions. All skip patterns, question verification, randomizations are executed.