JavaScript in Lighthouse Studio
Custom JavaScript Verification
Lighthouse Studio JavaScript Library
JavaScript is a scripting language that adds enhanced functionality and programming power to a web page. JavaScript code can verify that the input on a web page is correct before submitting it to the server. It can be used to do calculations on user input. Together with CSS, it can be used to change the appearance of the web page in real time. It is important to understand that JavaScript runs in the web browser, not on the server.
Lighthouse Studio makes extensive use of JavaScript. It is used to help validate responses to questions, fill in Constant Sum total boxes, and to un-check select options when a "None of these apply" is chosen, etc. Most of Lighthouse's system JavaScript is contained in ssi_javascriptX_X_X.js and ssi_admin_javascriptX_X_X.js located in the graphics/system directory.
Lighthouse Studio includes the jQuery JavaScript library. More information about this library can be found at http://jquery.com.
For a complete tutorial on JavaScript see http://www.w3schools.com/js.
How to Include Custom JavaScript in Lighthouse Studio
How to Include Custom JavaScript in Lighthouse Studio
JavaScript can be included in a Lighthouse survey almost anywhere text can be entered. For example, you could place some JavaScript code in the header of a question or as part of a response option. To include JavaScript on a page in Lighthouse Studio, you enclose JavaScript code in <script> </script> tags. For example, suppose you wanted to display a message in a pop-up box on the first page of your survey. You could place this text in Header 1 of the first question:
<script type="text/javascript">
<!--
alert("Welcome to the survey.");
//-->
</script>
The JavaScript code between the <script> tags is executed when the page is loaded. In this case, as soon as the web page is loaded in the browser, a popup box appears with the message "Welcome to the survey". Any JavaScript that needs to be available to the whole survey can be included in the HTML <head> Tag (Survey Settings, Headers and Footers).
JavaScript can be included as attributes of HTML tags. For example:
<a href="#" onclick="alert('hello');">Click Here</a>
When the link above is clicked, a message box with the message "hello" appears.
JavaScript can also be included in a separate file so that it can be accessed by multiple pages in your survey. This file can then be placed in your graphics folder and included with the following syntax:
<script type="text/javascript" src="[%GraphicsPath()%]CustomJavaScriptFile.js"></script>
The text above should be placed in the HTML <head> Tag (Survey Settings, Headers and Footers).
Variables in JavaScript can be declared with the "var" statement. For example:
var NumDaysInWeek = 7;
var MonthName = "March";
After this code is executed NumDaysInWeek will contain 7 and MonthName will contain "March". Notice that quotes are used when assigning text to a variable.
To retrieve the value of a question on the current page you can use Lighthouse's built-in SSI_GetValue(QuestionName) JavaScript function. Given any question name (or variable name) this function will return the value entered for that question on the current page. For example:
var Q1Value = SSI_GetValue("Q1");
var BlueChosen = SSI_GetValue("FavColors_1");
In the above example, the function SSI_GetValue retrieves the value for Q1 as entered on the page. It is then assigned to the Q1Value variable. The next line retrieves the value for the first check box in a Select question. BlueChosen is assigned a 1 if it is checked and a 0 otherwise.
To retrieve the response to a question from a prior page and use that value in your JavaScript, you should use Sawtooth Script in conjunction with JavaScript. For example, if NumWeeks was asked on a prior page of the survey and you wanted to use its value to do a simple calculation and display the result on the current screen, the following JavaScript could be used:
var NumDaysInWeek = 7;
var Weeks = [%NumWeeks%];
document.write(NumDaysInWeek * Weeks);
Before the web page comes down to the browser the Sawtooth Script [%NumWeeks%] is changed to the value that was entered on a prior page by the respondent. Lets assume that value was 4. The JavaScript loaded by the browser is:
var Weeks = 4;
To load text from a prior question, use:
var Name = "[%LastName%]";
which when it arrives at the browser would be:
var Name = "Smith";
Arrays, which are variables that can hold a collection of items, are also available:
var ItemList = [1,2,3,4,5,6,7];
document.write(ItemList[0]);
In the example above, an array of 7 items is declared. The first item in the array (with value 1) is written to the screen. Individual array items can be accessed with 0-based index numbers between [ and ]. So [0] returns the 1st item, [1] the 2nd, and so on.
JavaScript "if" statements can be used to conditionally execute code:
var Age = SSI_GetValue("Q1");
if(Age < 18)
{
alert("You do not qualify for this survey.");
}
In the code above, the value entered for Q1 is assigned to Age. If Age is less than 18 a message box appears.
If there are multiple paths that can be taken the "else if" statement can be used. For example:
var Age = SSI_GetValue("Q1");
if(Age < 18)
{
alert("You do not qualify for this survey.");
}
else if(Age < 65)
{
alert("You qualify for group 1.");
}
else if(Age >= 65 && Age <= 125)
{
alert("You qualify for group 2.");
}
else
{
alert("Are you sure you are older than 125?");
}
If the first "if" statement is false, the next "else if" logic is tested, and so on. If a section evaluates to true, its code is executed. Execution flow then continues after the final "else" or end of the block.
The following symbols are used in conditional logic:
•"&&" for AND
•"||" for OR
•"==" for equal
•<, >, <=, >=, etc.
The "for loop" allows your code to loop for a given amount of iterations. For example:
var myArray = [1,2,3,4,5];
var i = 0;
var sum = 0;
for(i = 0; i < myArray.length; i++)
{
sum += myArray[i];
}
alert(sum);
The variable "i" starts at 0 and counts up to the length of the array (in this case 5). The code inside the "for" loop block is executed 5 times. The code accesses each item in the array, storing the sum of all the items in the "sum" variable.
Functions are sections of code that can be defined and used when needed by "calling" them. For example:
function AddTwo (Num1, Num2)
{
var Result = Num1 + Num2;
return Result;
}
alert(AddTwo(4, 6)); //The value 10 will appear in a pop-up box.
alert(AddTwo(56, 33); //The value 89 will appear in a pop-up box.
In the code above, a function named "AddTwo" is defined. This function takes two numbers for input named "Num1" and "Num2". Any two numbers that are passed into this function are added and the result is returned.
Functions are best defined in the HTML <head> Tag (Survey Settings, Headers and Footers) or in a separate file that is included in the HTML <head> Tag. This makes it so that the functions are available throughout the whole study.
Each survey page created by Lighthouse Studio contains an HTML form tag named "mainform". All of the HTML input elements for the questions on this page are inside this form. Using JavaScript, you can get access to JavaScript objects that represent these form elements. You can use JavaScript to manipulate these input elements by changing their properties and functions. Having access to these form elements gives you access to their properties and functions. The following JavaScript code assigns a form object to a variable:
var Q1Obj = document.mainform["Q1"];
This can also be done by calling a Lighthouse JavaScript system function like this:
var Q1Obj = SSI_GetFormObject("Q1");
Now Q1Obj can be used to get and set values and to set up events etc. For example:
Q1Obj.value = 5;
Q1Obj.addEvent("keyup", SetToFive);
function SetToFive()
{
this.value = 5;
}
Here, we are assigning a 5 to the "Q1" numeric question. This causes a 5 to appear in the numeric box on the screen. The next line of JavaScript then assigns an event to the question. If the respondent types into the Q1 box every time a key is pressed and released ("keyup") then the function "SetToFive" is called. In this function "this" represents "Q1Obj". This code essentially makes it so that the respondent cannot alter the value for "Q1". The events "keyup", "click", "mouseover", "mouseout", etc. can be used.
To get a value from a question on the page, use SSI_GetValue("QuestionName"). This function handles the complexities of different question types (radio, checkbox, numeric, etc.).
Custom JavaScript Verification
Warning:
This is an advanced area, intended for those who know JavaScript. You must completely test your survey and custom JavaScript code to ensure that it functions properly and that the data for your entire survey are being saved correctly. Sawtooth Software does not provide technical support for your custom JavaScript.
There might be times when our default question verification will not accomplish the functionality you want. Most questions (with the exception of the password, Terminate, and conjoint questions) have a Custom JavaScript Verification section. This is available by editing the question, clicking on the "Advanced" button, and then selecting the "Custom JavaScript Verification" tab.
Custom JavaScript Verification allows you to specify custom verification for your questions. Your custom verification, written in JavaScript, is invoked when the respondent clicks the "Submit" button. You can configure your custom JavaScript to be called "before" or "after" the built in question JavaScript verification.
Your respondents must have JavaScript enabled (most do) in order for your custom JavaScript to work.
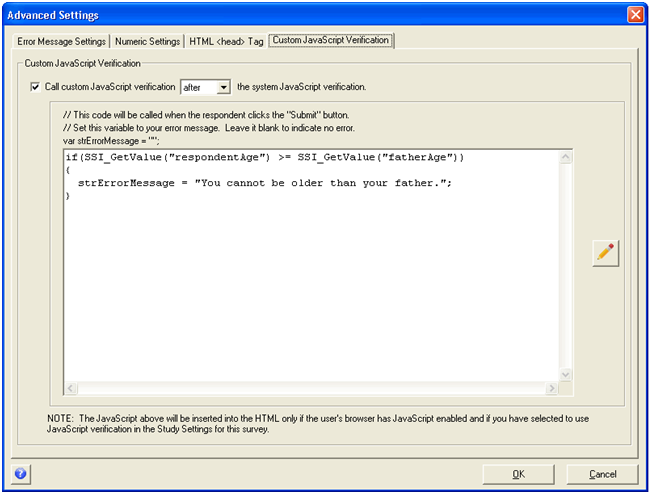
In the example above, an error message is displayed and respondents cannot continue the survey if they have specified that they are older than their father.
The age of the respondent ("respondentAge") and of the father ("fatherAge") are asked on the current page. These values have not been submitted to the server yet or recorded in the database. They are on the same page where this custom JavaScript is executed. The values of questions on the same page as the JavaScript that you are writing are available through the following JavaScript:
SSI_GetValue("QuestionName")
The JavaScript SSI_GetValue is defined in Lighthouse's system JavaScript file ssi_javascriptX_X_X.js located in the graphics/system directory.
In the example above if the value of "respondentAge" is greater than or equal to "fatherAge" then "strErrorMessage" is set to a custom error message. Setting strErrorMessage equal to something other than empty will cause the system JavaScript to display an error message on the screen and highlight the current question. The current page will also not submit to the server as long as strErrorMessage has a value assigned to it.
If multiple questions on a single page all have custom JavaScript verification, then each section of custom JavaScript is run in order from top to bottom.
If you would like to retrieve information from previous pages you need to use Sawtooth Script. If the respondent's age was submitted on a previous page, the JavaScript would then employ Sawtooth Script and look like this:
if([%respondentAge%] >= SSI_GetValue("fatherAge"))
Sawtooth Script executes on the server and the respondent's age (lets assume it is 37) is inserted. The resulting JavaScript is sent down to the browser and looks like this:
if(37 >= SSI_GetValue("fatherAge"))
Lighthouse Studio JavaScript Library
Lighthouse Studio comes with built in JavaScript code. The system JavaScript is used by Lighthouse Studio to help validate responses to questions, fill in Constant Sum total boxes in real time, and to un-check select options when an "Other Specify" is chosen etc. There are a few functions from the built in system JavaScript that you might find useful.
SSI_ShowAlert("Message", "Title", Width, Height)
Displays a pop-up dialog with a specified message and title. The Title, Width, and Height parameters are all optional.
Example:
SSI_ShowAlert("Please specify a number greater than 100", "Attention"); // A pop-up dialog is displayed with the specified message.
SSI_GetValue("QuestionName")
Returns the current value for the specified QuestionName, for any question type (radio, checkbox, numeric, etc.). A zero ("0") is returned for questions that have been left empty.
Example:
var Num1 = SSI_GetValue("Q1"); // returns the value of question Q1
var FirstStateChecked = SSI_GetValue("State_1"); // If the first check box of question "State" is checked 1 will be returned, otherwise 0.
SSI_GetFormObject("QuestionName")
Returns the object associated with the form element on the page for QuestionName.
Example:
var Num1Obj = SSI_GetFormObject("Q1"); // Assigns the form object for question "Q1" to "Num1Obj".
Num1Obj.value = 46; // Assign the value of 46 to the Q1 question.
SSI_RoundNumber(Number, NumDecimalPlaces)
Round "Number" to "NumDecimalPlaces".
Example:
var Value1 = SSI_RoundNumber(SSI_GetValue("Q1"), 2); // SSI_GetValue returns the value for Q1 it is then rounded to 2 decimal places.
alert(Value1); // Assuming Q1 was 45.236 the Value1 would yield 45.24
SSI_PriceFormat(Number, "ThousandSymbol", "DecimalSymbol")
Formats a number with the thousands symbol and decimal symbol.
Example:
var FormatValue = SSI_PriceFormat(5123693.25, ",", "."); // 5,123,693.25 is returned.
SSI_CustomGraphicalCheckbox(GraphicalCheckboxObj, InputObj, blnCheck)
SSI_CustomGraphicalCheckbox is a function that has been provided so that you can write custom code that gets called when a graphical checkbox is clicked. This function must be defined by you in your custom JavaScript. The function will be called by Lighthouse's system JavaScript each time a check box is clicked.
GraphicalCheckboxObj represents the graphical item on the page that is being clicked. InputObj is the actual hidden checkbox on the page that the graphical checkbox represents. blnCheck is true if the checkbox has been checked, otherwise it is false.
Example:
function SSI_CustomGraphicalCheckbox(GraphicalCheckboxObj, InputObj, blnCheck)
{
if(InputObj.name == "mySelect_1" && blnCheck == true)
{
alert("The first box was checked");
}
}
SSI_CustomGraphicalRadiobox(GraphicalRadioObj, InputObj)
SSI_CustomGraphicalRadiobox is a function that has been provided so that you can write custom code that gets called when a graphical radio button is clicked. This function must be defined by you in your custom JavaScript. The function will be called by Lighthouse's system JavaScript each time a radio box is clicked.
GraphicalRadioboxObj represents the graphical item on the page that is being clicked. InputObj is the actual hidden radio button on the page that the graphical radio button represents. When ever this function gets called the radio button represented by InputObj will have been checked.
Example:
function SSI_CustomGraphicalRadiobox(GraphicalRadioboxObj, InputObj)
{
if(InputObj.name == "mySelect")
{
alert("A radio button with the value " + InputObj.value + " has been selected.");
}
}
SSI_SetSelect(strInputName, blnSelect)
SSI_SetSelect allows you to select (or check) a radio button or checkbox through JavaScript. This is especially helpful with graphical radio buttons and checkboxes.
strInputName is the name of the input id for the particular HTML input item. For example to select the radio button with list value 2 in question "Q1" strInputName would be "Q1_2". blnSelect should be "true" to select the radio button or checkbox and "false" to de-select it.
Example:
SSI_SetSelect("colors_3", true); //Checks list item with value 3 in the colors question.
SSI_SetSelect("colors_5", false); //Un-checks list item with value 5 in the colors question.
SSI_RadioReset(strInputName)
SSI_RadioReset will de-select all of the radio buttons in the question defined by strInputName.
strInputName is the name of the select radio question or row or column if it is in a grid.
Example:
SSI_RadioReset("colors"); //De-selects all of the radio buttons for the "colors" question.
SSI_RadioReset("choices_r1"); //De-selects all of the radio buttons in the first row of the grid question.
SSI_ScreenWidth()
SSI_ScreenWidth returns the screen width (in pixels) of the respondent's browser. This can be useful to detect mobile devices accessing the survey.
Example:
SSI_ScreenWidth(); //Returns 375 if the respondent's browser window is 375 pixels wide
If you wish to run custom JavaScript code after the web page has loaded you should consider using the "ssi_ready" event. Lighthouse Studio has system JavaScript that runs once the page is loaded (after the "document ready" and "window load" events have executed). Most of the time you will want to wait for the system JavaScript code to execute before running your custom code. The "ssi_ready" event is executed after all Lighthouse Studio JavaScript has run.
Example:
$(document).on("ssi_ready", function()
{
//Your custom code goes here
});
You are responsible to ensure your custom JavaScript is working. The following tips are highly recommended when trying to debug your custom JavaScript:
Turn on script error reporting. This is done in Internet Explorer by clicking Tools | Internet Options | Advanced. Under the Advanced tab go to the Browsing section and check Display a notification about every script error. This is extremely useful in alerting you to mistakes in your code.
Use the "alert( )" function. If you are unsure what certain values are at certain points in your code, you can print them out to the screen by using the "alert( )" function. For example:
alert("My value at this point is: " + SSI_GetValue("Q1"));
Firefox has a plug-in named "Firebug" that provides a powerful JavaScript debugger.
Test your custom JavaScript in multiple browsers (e.g. Microsoft Internet Explorer, Firefox, etc.).
Lighthouse Studio uses the jQuery JavaScript library. This JavaScript library makes it simpler to interact with HTML and to setup JavaScript events on the page etc. jQuery is included on every page that Lighthouse Studio creates. This makes it possible to write custom JavaScript code that uses jQuery. For documentation on jQuery see http://jquery.com
Creating a jQuery Object
One of the most powerful things about jQuery is the simplicity in which you can create a JavaScript object from an HTML element on the page. For example lets say you have the HTML for a numeric question on the page:
<input id="q1" class="text_input" name="q1" type="text" size="3">
If you wanted to interact with this HTML using jQuery you could use the following JavaScript syntax:
$("#q1")
The "$" sign (or alternatively "jQuery") is a function that returns a JavaScript object based on the selector text that is passed to it. The selector text is basically CSS. The "#q1" above is the CSS code that you would use to select the HTML that has an "id" equal to "q1". To select q1's Header 1 you could do this:
$("#q1_div .header1")
With this jQuery object you can now access the jQuery library. For example:
$("#q1_div .header1").html("Header 1 text");
will place the text "Header 1 text" into the header of "q1".
Running Code After the Page Loads
Often it is useful to call JavaScript code once the web page has loaded. To do this use the SSI Ready event.
Getting/Setting Values from Input Fields
To get or set a value to an input field use the "val" function. For example:
$("#age").val(55);
sets the value of age to 55 and
$("#age").val();
returns the value that is stored in "age".
If you need to get the actual JavaScript object (not the jQuery object) then you can do this:
$("#age")[0];
This is the same as:
document.mainform["age"]
Setting Up Events
Events are actions that happen on a web page. A mouse click is an example of an event. jQuery makes it easy to write JavaScript code that can respond to those events. For example lets say that you wanted to change the background color of a question when a respondent moves their mouse over the question. This would give the question a highlight effect. Here is some sample code:
<style type="text/css">
.highlight_question
{
background-color: #EEEEEE;
border: 1px solid #c0c0c0;
}
</style>
<script type="text/javascript">
$(document).on("ssi_ready", function()
{
$(".question").mouseover(function()
{
$(this).addClass("highlight_question");
});
$(".question").mouseout(function()
{
$(this).removeClass("highlight_question");
});
});
</script>
First a CSS class of "highlight_question" is defined. This class has the settings of a light grey background color and a grey border.
Next the jQuery JavaScript code is defined. After the web page has been loaded the SSI Ready event is called. The $(".question") grabs all of the HTML for the questions on the page. For each of the questions on the page it applies the "mouseover" event. When the mouse is moved over the question the "highlight_question" CSS class will be applied to the question. This is done with the "addClass" command. The "this" keyword contains the current "question" object.
The code then defines the behavior for what should happen on the "mouseout" event. It removes the "highlight_question" class when the mouse moves off the question.