After you have specified the names for Password(s) or (optional) Merged Fields that you will be using in the study, you need to provide the password data. Lighthouse Studio stores the password data (including any Merged Fields, as shown in the example below) within a .csv file named studyname_pwds.csv). There is virtually no limit to the number of rows of information in this table (we have had success importing or autogenerating a few million password rows). The number of columns in the password table along with available memory for your PC will affect your ability to import or autogenerate huge password tables.
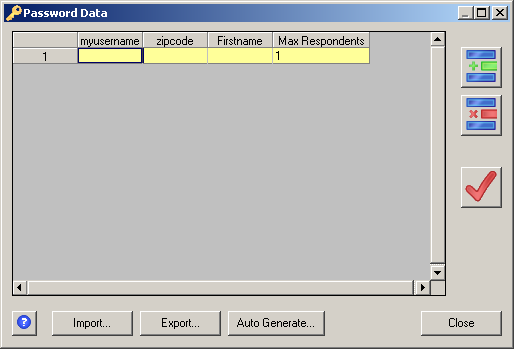
Click the Password Data icon to access this database file. The file is opened and the display is similar to the look of a spreadsheet.
In the example directly below, we have opened the Password Data dialog for a study where we've already defined one password field myusername as well as two additional variables we already know prior to interviewing the respondent (Merged Fields) called, zipcode and Firstname. We will not be asking the respondent to specify a zipcode and Firstname after logging into the survey, since we'll already be able to match and merge that information from merged data once the respondent provides a correct (and unique) myusername.
Max Respondents indicates how many respondents will be allowed to access the survey using the password combination for that row. The default is 1 and this has the benefit of allowing respondents to restart an incomplete survey where they left off.
Now that we've defined the three variables to be included in the password data, we just need to add the rows of data. There are multiple ways to add the password and merged fields information.
Directly typing: Highlight the field you wish to edit with the mouse and begin typing.
Copy and Paste from a Windows application: While in a separate Windows application such as Microsoft Excel, select an area by clicking and dragging the mouse over the desired cells. Press Ctrl+C (or Edit + Copy) to copy the contents into the clipboard. Switch windows back to Lighthouse Studio. Position the cursor where you want the data to begin within the Password Data table. Press Ctrl+V (or Edit + Paste) to paste the information into the Passwords Data table.
Importing from a .CSV file: Click the Import... button to merge information from a text-only .CSV (comma-separated value) file. The file must include a header row, with labels matching the labels you defined for Passwords and Merged Fields. If you want to import a Max Respondents field, you must also include that column within your .CSV file, with a column header label Max Respondents. If you do not include a Max Respondents field in your .CSV file, Lighthouse Studio automatically inserts Max Respondents=1 for all rows.
When you attempt to import data into a Passwords file that already contains rows of information, you are asked whether you would like to append to or overwrite the existing data.
Note: if you are importing a data file that has lots of columns, there is a copy-and-paste trick to avoid having to first type each field name into Lighthouse Studio (see below).
Auto Generate: Click Auto Generate... to generate passwords with random values (text or numeric). You are asked to supply the following:
Number of Rows to Generate: Specify how many rows you wish to generate.
Number of Characters: Specify how many characters (letters and/or numbers) should be used for each password.
Use Letters/Numbers: Check whether you wish to generate passwords that include only letters or only numbers.
Exclude: Indicates which characters should never be used. By default, the following are excluded, because they can lead to confusion when respondents are asked to re-type their passwords:
I O 0 1 |
(Capital I, as in India) (Capital O, as in Oregon) Zero One |
You can add any additional characters you'd like to exclude.
Of course, if you are automatically including the password information in the URL string (One-Click Access), then respondents will not be asked to re-type their passwords and it is not necessary to exclude any confusing characters.
Auto Generate doesn't check for duplicate records as it generates the records. Therefore, if you wish to generate a large number of passwords, you may need to generate an even larger number to yield the target number of passwords once duplicates have been purged. To purge duplicates, click the Verify Password Data icon (looks like a red check mark). If you happen to forget this step, you will be warned regarding any duplicate passwords when testing your survey under Local Test Server or when you Prepare for Web Upload prior to fielding your study. At that point, you must return to delete any duplicates here on the Password Data dialog before testing or fielding your study.
Auto Generate doesn't check for words that may be considered offensive. If you are auto-generating text-only passwords, you may want to check for offensive words.
Supported Characters for Passwords:
Only ASCII codes 32 to 126 may be used for passwords. The following table displays these valid characters:
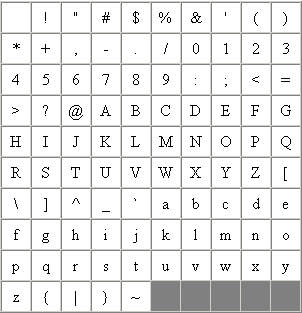
Merged Field data are not limited to ASCII codes 32 to 126.
Trick for Importing a Large Table of Password Fields (without having to retype the field names):
The general process for importing Password (and Merged Fields) information from a .CSV file requires that you first specify one-at-a-time the column labels for all variables you are importing. If you have a .CSV file with variables whose header labels already conform to Lighthouse question naming conventions, there is a copy-and-paste trick for bringing those labels into Lighthouse Studio that can save you a great deal of time and hassle.
1. Create a .CSV (comma-separated value) file that contains your password data (including any additional merged variable fields and a Max Respondents field if you need anything other than Max Respondent=1).
2. Within a spreadsheet program like Excel, highlight the first row containing the header labels. Copy this selection to the clipboard by pressing Ctrl+C or Edit+Copy. In a separate worksheet, click Edit+Paste Special+Transpose. (This copies the header labels to the second Excel worksheet and transposes them into a single column with multiple rows.)
3. Within your second Excel spreadsheet where the labels are now arranged as a single column with multiple rows, highlight just the labels for the password variables. Press Ctrl+C or Edit+Copy to copy this selection to the clipboard. Open the Questionnaire Access and Passwords dialog. Open the Password Fields tab. Put your cursor in the upper-left cell in that table and press Ctrl+V or Edit+Paste to paste in just the fields to be used as passwords.
4. Repeat the steps outlined directly above to copy-and-paste the Merged Field labels into the Merged Fields tab.
5. Now that all labels have been defined, click the Password Data... icon to open the password file. Click Import... and follow the prompts to import the password data from your .CSV file (or cut and paste the data from your Excel spreadsheet directly into the grid).