Tutorial Specifications:
•Subject Matter: Desktop vs. Laptop for work use
•Design Summary:
7 attributes associated with laptops
5 attributes associated with desktops
Summed Pricing or alternative-specific pricing
Conditional display to merge attribute rows
Note: This is an advanced ACBC tutorial. If you are beginning with ACBC, we suggest you first complete the "Beaches" Tutorial #1.
Introduction
Adaptive CBC (ACBC) provides a great deal of power and flexibility through alternative-specific designs.
With traditional conjoint attribute lists every attribute needs to apply to every product concept. This works fine for many studies, but researchers commonly face situations in which some attributes only apply to certain brands or levels of technology, etc. Such is the case with alternative-specific designs.
The classic example of alternative-specific designs involves transportation choices to get to work: commuters can take the bus, the train, a personal car, or a bicycle. The attributes for buses and trains (frequency, round-trip fare, WiFi availability) are different from the attributes for cars or bicycles. And yet, we might want to study how much improvement in buses and trains would lead a person to switch from driving a car or riding a bicycle.
The example we highlight in this tutorial involves the choice of laptops versus desktops, Windows OS (operating system) versus Mac OS. There are attributes of laptops (e.g. battery life) that aren’t applicable to desktops. And, there are brands for Windows OS machines that don’t apply to Mac OS machines (Apple is the only brand for Mac OS).
The Client Situation
Imagine a client brings you a tradeoff study that leads to an attribute list as portrayed in the schematic shown below (as might have been drawn up in a white boarding session by you and your client). The thought is that people have a choice between laptops and desktops when buying a machine for work purposes.
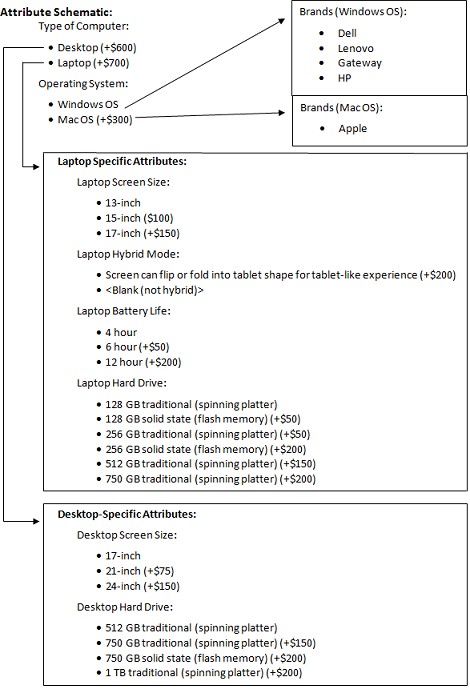
In this example, we have also attached incremental prices to certain levels, leading to ACBC’s “Summed Pricing” approach. However, we will also show you how to execute this study if you do not wish to do level prices and summed pricing.
What you and your client are envisioning is a choice layout such as this, for tradeoffs among laptops and desktops:
You also realize that the decision could involve some non-compensatory (must-have) aspects. People are often sharply divided between Windows and Mac OS. Also, some people absolutely must have a laptop as their work computer. ACBC does good job accounting for non-compensatory decision-making and customizing the choice scenarios for different respondent preferences.
Specifying the Attribute List:
The first step is to start a new project and specify the attribute lists.
Start Lighthouse Studio, by clicking Start | All Programs | Sawtooth Software | Sawtooth Software Lighthouse Studio.
Click File | New Study and specify a new study such as computers.
Click Compose | Lists… to access the list manager.
Click Add Predefined List to add the first list, named: attributes.
List Name: Attributes
Type of Computer:
Operating System:
Brands (Windows OS):
Brands (Mac OS):
Laptop Screen Size:
Laptop Hybrid Mode:
Laptop Battery Life:
Laptop Hard Drive:
Desktop Screen Size:
Desktop Hard Drive:
Summed Price
To save time, you can copy-and-paste the list elements into the interface by copying them from this document (highlighting and then pressing CTRL-C) and then within the Lighthouse Studio interface clicking the Paste list members from clipboard icon ![]() .
.
Using the same pattern, add the other pre-defined lists to the list manager:
List Name: ComputerType
Desktop
Laptop
List Name: OS
Windows OS
Mac OS
List Name: BrandsWindows
Dell
Lenovo
Gateway
HP
List Name: BrandsMac (this attribute for display purposes only; not utility estimation)
Apple
Apple
List Name: LaptopScreenSize
13-inch
15-inch
17-inch
List Name: LaptopHybridMode
Screen can flip or fold into tablet shape for tablet-like experience
<!-- blank -->
List Name: LaptopBatteryLife
4 hour
6 hour
12 hour
List Name: LaptopHardDrive
128 GB traditional (spinning platter)
128 GB solid state (flash memory)
256 GB traditional (spinning platter)
256 GB solid state (flash memory)
512 GB traditional (spinning platter)
750 GB traditional (spinning platter)
List Name: DesktopScreenSize
17-inch
21-inch
24-inch
List Name: DesktopHardDrive
512 GB traditional (spinning platter)
750 GB traditional (spinning platter)
750 GB solid state (flash memory)
1 TB traditional (spinning platter)
Adding the ACBC Exercise
Now that you have specified the lists involved in this ACBC study, you are ready to add the ACBC exercise itself to your questionnaire. If you are still in the List Manager, click OK to close the dialog.
Click Compose | Write Questionnaire. Click Add… and then add an ACBC Exercise to your study called myacbc.
When you click OK, the ACBC Exercise Settings dialog is displayed.
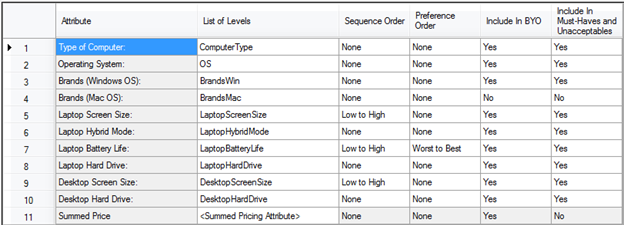
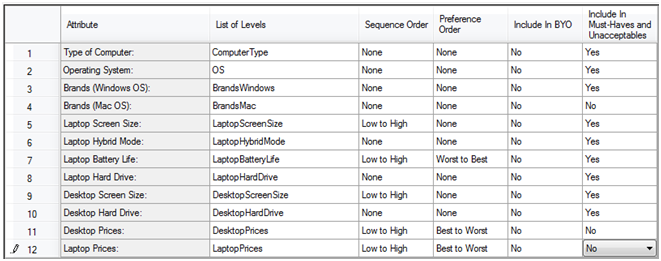
For List of Attributes, select Attributes. Under the List of Levels column, select the list associated with each of the attributes in your study. For Summed Price, select <Summed Pricing Attribute>.
On this same dialog,
1.Specify that the Sequence Order for Laptop and Desktop screen size is Low to High.
2.Specify that the Sequence Order for Laptop Battery Life should be Low to High. Specify that the Preference Order for this attribute should be Worst to Best.
3.Under Include in BYO (build-your-own question), specify that the Brands (Mac OS) attribute should not be shown in the BYO question.
4.Also, specify that the Brands (Mac OS) attribute should not appear in the Must Haves or Unacceptables questions.
When you’re done, the grid should look like:
Specifying the Level Pricing for Summed Pricing
From the ACBC Exercise Settings dialog, click the Pricing tab.
For Type of Computer, specify the following level prices:
Level |
Component Prices |
|---|---|
Desktop |
600 |
Laptop |
700 |
Using the drop-down control near the top of this dialog, select the other attributes with component-based prices and specify their prices:
Operating System:
Level |
Component Prices |
|---|---|
Windows OS |
|
Mac OS |
300 |
Laptop Screen Size:
Level |
Component Prices |
|---|---|
13-inch |
|
15-inch |
100 |
17-inch |
150 |
Laptop Hybrid Mode:
Level |
Component Prices |
|---|---|
Screen can flip... |
200 |
<!-- Blank --> |
|
Laptop Battery Life:
Level |
Component Prices |
|---|---|
4 hour |
|
6 hour |
50 |
12 hour |
200 |
Laptop Hard Drive:
Level |
Component Prices |
|---|---|
128 GB traditional (spinning platter) |
|
128 GB solid state (flash memory) |
50 |
256 GB traditional (spinning platter) |
50 |
256 GB solid state (flash memory) |
200 |
512 GB traditional (spinning platter) |
150 |
750 GB traditional (spinning platter) |
200 |
Desktop Hard Drive:
Level |
Component Prices |
|---|---|
512 GB traditional (spinning platter) |
|
750 GB traditional (spinning platter) |
150 |
750 GB solid state (flash memory) |
200 |
1 TB traditional (spinning platter) |
200 |
On the same dialog, specify that the prices should randomly vary +/-30% from the summed prices (that’s already the default). Let’s also round the prices to the nearest $25.

Specifying Alternative-Specific Attributes
Next, we need to specify that certain attributes are conditional (dependent) upon the Type of Computer:
•Laptop Screen Size
•Laptop Hybrid Mode
•Laptop Battery Life
•Laptop Hard Drive
•Desktop Screen Size
•Desktop Hard Drive
Also, certain attributes are conditional (dependent) upon Operating System:
•Brands (Windows OS)
•Brands (Mac OS)
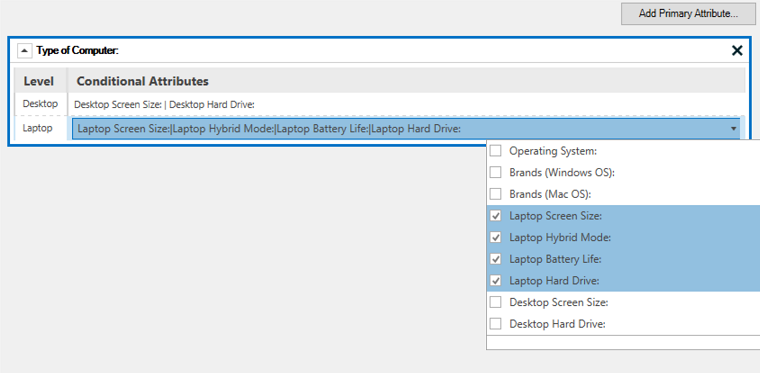
From the ACBC Exercise Settings dialog, click the Alternative-Specific tab.
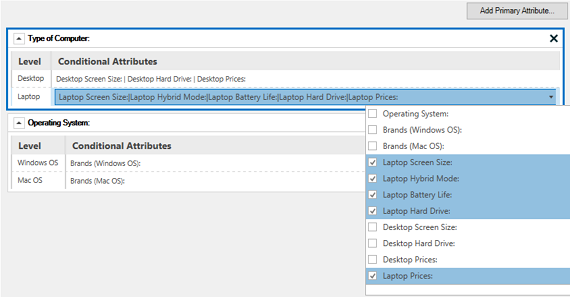
Click Add Primary Attribute… and select Type of Computer and then OK. The Primary Attribute is the triggering attribute which conditional attributes depend upon.
Next select which attributes should be displayed when the type of computer is a Desktop.
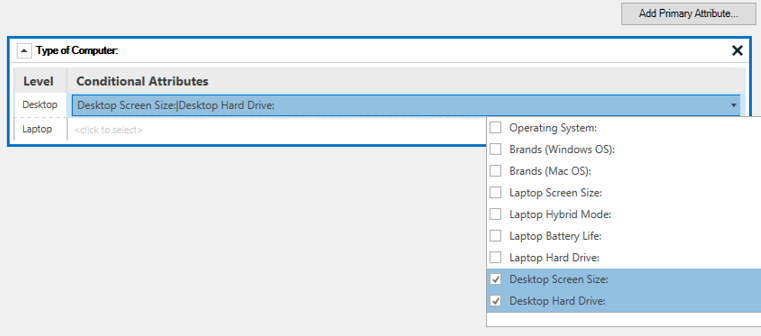
Now do the same thing for Laptop.
Now click Add Primary Attribute… again to specify the second alternative-specific relationship. Choose Operating System as the Primary Attribute and click OK.
Select Brands (Windows OS) for Windows OS and Brands (Mac OS) for Mac OS. See below:

Specifying the Design
Click the Design tab to specify the settings that govern the design generation and questionnaire flow.
The settings you choose depend on how much information you want to ask from each respondent (how much time you want them to spend making choices). If you have a relatively large sample size, you may decide to have each respondent work less hard (and achieve less precision at the individual level). If you have relatively small sample size, you’ll want to ask each respondent to exert more effort so you can obtain higher precision with each respondent.
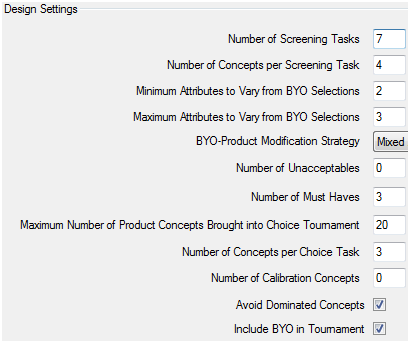
For the purposes of this example, we’ll have ACBC generate 28 near-neighbor concepts for each respondent to evaluate. We’ll arrange these into 7 Screening Tasks screens, where each task displays 4 concepts.
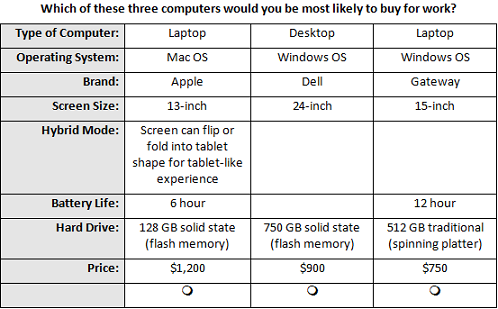
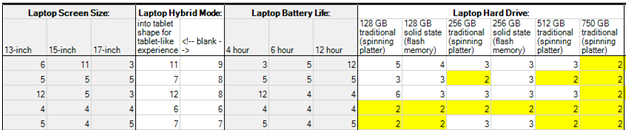
We also need to decide how many attributes we want ACBC to change from the respondent’s BYO-selected ideal product when generating near-neighbor concepts. To decide this, it’s helpful to review what each product concept looks like (in terms of numbers of attributes involved with each alternative). Here’s a sample display of three product concepts that possibly could be generated:

Note that a Laptop concept is made up of 8 different attributes (7 not including Summed Price). A Desktop concept is made up of 6 different attributes (5 not including Summed Price). As a general rule, we don’t want to change more than half of the attributes from the BYO-selected concept when generating a new near-neighbor concept. So, it would seem to make sense to vary from minimum = 2 to maximum = 3 of the BYO-selected attributes when generating a new near-neighbor concept.
Regarding the number of Unacceptables and Must-Haves, we have found for alternative-specific designs that the Unacceptables questions can often present an overwhelming number of potential unacceptable levels for the respondent to review. Thus, let’s just ask Must Have questions, which don’t show so many potential levels to the respondent to overly tax their attention.
A recommended series of settings for our study is given below:
Click OK to close this dialog.
These settings lead to the following questionnaire flow for this study:
•BYO
•Screener 1 (showing 4 concepts)
•Screener 2 (showing 4 concepts)
•Screener 3 (showing 4 concepts)
•Screener 4 (showing 4 concepts)
•Must Have 1
•Screener 5 (showing 4 concepts)
•Must Have 2
•Screener 6 (showing 4 concepts)
•Must Have 3
•Screener 7 (showing 4 concepts)
•Choice Tournament Task 1 (showing 3 concepts)
•Choice Tournament Task 2 (showing 3 concepts)
•Choice Tournament Task 3 (showing 3 concepts)
•Choice Tournament Task 4 (showing 3 concepts)
•Choice Tournament Task 5 (showing 3 concepts)
•Choice Tournament Task 6 (showing 3 concepts)
•Choice Tournament Task 7 (showing 3 concepts)
•Choice Tournament Task 8 (showing 3 concepts)
•Choice Tournament Task 9 (showing 3 concepts)
•Choice Tournament Task 10 (showing 3 concepts)
(Not every respondent will see all 10 Choice Tournament Tasks. Only respondents who indicate that 20 or more of the 24 concepts are a possibility in the Screener section will see all 10 tournament tasks. For example, if a respondent indicates that 12 of the 28 near-neighbor concepts are a possibility in the Screener section, then 12/2=6 Choice Tournament Tasks are displayed.)
Testing the Design
ACBC can automatically generate robotic respondent answers, where the answers are random. This lets you see how many times each level appears for each respondent and the standard errors (the precision, as estimated using aggregate logit) per level and attribute.
From the Design tab, by default the test design suggests using just 5 robotic respondents. This is fine for your first test (to see how many times each level appears for each respondent).
Click Test Design… and the following report is displayed:
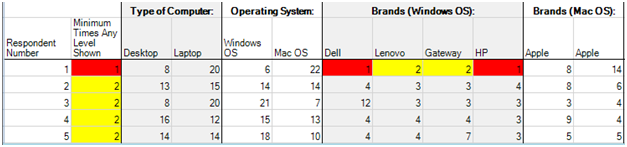

(Note that we’ve divided the report above into three sections so we can represent it here in this document. The frequencies for the levels shown for 5 respondents is given.)
Any cells with a count of 1 or less are marked in red. Any cells with 2 counts are marked in yellow. Other cells with counts >2 are not color-coded. With standard (non alternative-specific designs) in ACBC, we generally recommend each level appear a minimum of 2 times and preferably 3 times per respondent. With alternative-specific designs, that isn’t always possible or necessary. For example, respondent #1 selected a laptop with a Mac OS (we can tell because of the oversampling of the BYO-selected levels in the design). Therefore, the near-neighbor designs will show fewer Desktops and Windows OS machines for this respondent to evaluate. For Windows OS brands and the Desktop Hard Drive size levels, there are two instances for this respondent (who prefers a laptop with a Mac OS) in which levels appear just once. This, in our opinion, is to be expected and should still lead to reasonable utility estimation (given the benefits of HB estimation for borrowing information across respondents in the population).
Next, let’s get a feel for the precision across the sample that we could expect if we were to field such a study. Let’s imagine that we had planned to interview 250 respondents. We change the 5 respondents to 250 respondents and run Test Design again. After about 30 minutes or more of computation, the report is shown.
Attribute Level |
Standard Errors |
Desktop |
0.024 |
Laptop |
0.024 |
Windows OS |
0.022 |
Mac OS |
0.022 |
Dell |
0.043 |
Lenovo |
0.044 |
Gateway |
0.044 |
HP |
0.043 |
13-inch |
0.034 |
15-inch |
0.033 |
17-inch |
0.034 |
Screen can flip or fold into tablet shape… |
0.025 |
<!-- blank --> |
0.025 |
4 hour |
0.035 |
6 hour |
0.033 |
12 hour |
0.035 |
128 GB traditional (spinning platter) |
0.052 |
128 GB solid state (flash memory) |
0.052 |
256 GB traditional (spinning platter) |
0.052 |
256 GB solid state (flash memory) |
0.053 |
512 GB traditional (spinning platter) |
0.053 |
750 GB traditional (spinning platter) |
0.054 |
17-inch |
0.041 |
21-inch |
0.039 |
24-inch |
0.041 |
512 GB traditional (spinning platter) |
0.050 |
750 GB traditional (spinning platter) |
0.050 |
750 GB solid state (flash memory) |
0.049 |
1 TB traditional (spinning platter) |
0.050 |
Summed Price |
0.097 |
NONE |
0.046 |
(Note: we have excluded the Apple brand attribute from the analysis, since it is just a place-holder for display purposes only. The full utility associated with the Apple brand is thus captured in the Mac OS partworth.)
With non-adaptive CBC studies, we have generally recommended that researchers can use aggregate logit to test the precision of their CBC studies, given a certain number of expected respondents. Our rule of thumb for the aggregate logit test and random responders is to strive for standard errors of main effects of 0.05 or less (for generic attributes) and standard errors of 0.10 or less for alternative-specific effects and interaction terms. Similar rules-of-thumb apply as well to ACBC. But, you will often find that ACBC studies can achieve better precision than CBC with fewer respondents due to the interactive nature of the questionnaire that keeps respondents engaged longer in making tradeoff decisions and choices.
This report for n=250 shows that the alternative-specific attributes have standard errors no larger than about 0.05. Generic attributes (Type of Computer and Operating System) that apply to every product concept have standard errors around 0.02. So, these standard errors are well within the guidelines suggested by the rule of thumb.
An interesting anomaly is the standard error for the Summed Price attribute. Summed Price does lead to some correlation in the design matrix between the Summed Price variable and the other attributes (since the summed price is somewhat related to the levels for the other attributes); thus the standard error is larger than we would see for attributes within typical orthogonal designs. Other research we have conducted suggests that varying price at least +/-30% from the summed prices leads to reasonable precision of the price coefficient—provided you help the solution converge properly by constraining price to be negative sign (lower prices preferred to higher prices).
Fine-Tuning the Questionnaire from a Human Perspective
The previous section dealt only with using robotic respondents to take the ACBC survey and examining the precision of the utility estimates via aggregate logit. However, our purpose is to interview real respondents and we need to know that the interview reads well and flows well for them.
We haven’t taken the time in this tutorial to coach you regarding editing the text for each ACBC question (BYO, Screening Tasks, Must Haves, and Choice Tournament tasks), fine-tuning the layout of each question, or for providing transitional HTML/Filler questions between the sections. Such coaching is given in the standard ACBC tutorial that ships within the Lighthouse Studio help.
To test the questionnaire, click Test | Test Survey.
When you test the survey, the first thing you will notice in the BYO is that it is strange to have the 2nd level of Laptop Hybrid Mode be blank. It seems to make a lot of sense to have that level be blank within the Screening and Choice Tasks section, but we need to see some text showing for that blank level in the BYO question and also in the MustHave questions. There is straightforward way to accomplish this with Conditional Display. However, we’ll show you an Unverified Perl trick for doing this here. Rather than putting <!-- Blank --> as the level text for the second (null) level of Laptop Hybrid Mode, you can use the following unverified Perl code in its place (edit the list associated with Laptop Hybrid Mode and put the following text as its second element):
[%
begin unverified perl
if(QUESTIONNAME() eq "myacbc_BYO"||
QUESTIONNAME() eq "myacbc_MustHave1"||
QUESTIONNAME() eq "myacbc_MustHave2"||
QUESTIONNAME() eq "myacbc_MustHave3")
{
return "No hybrid capability";
}
else
{
return "";
}
end unverified
%]
This script tells the browser to display “No hybrid capability” on all screens except the BYO and Must Have screens, where a blank will be displayed.
Merged Rows:
If you view a Screening Task for the study, as specified to this point, it looks something like:
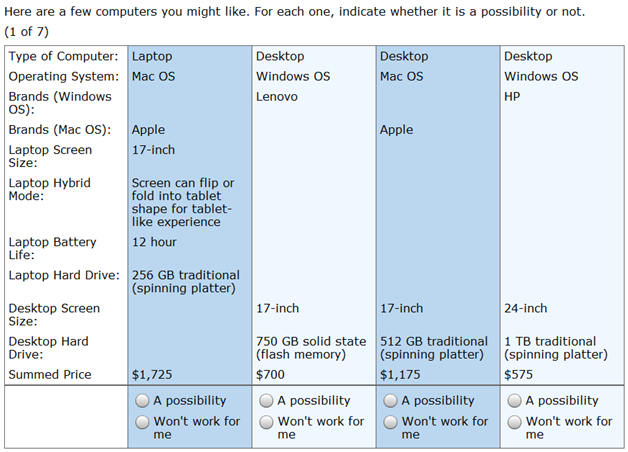
While the display above indeed shows the necessary information for each Laptop or Desktop, the information is laid out inefficiently and in some cases out of order. For example, rather than showing brands on two separate rows (those for Windows on a separate row from those for Mac OC), it would be nice to merge the brand labels onto the same row. Same issue applies to Screen Size and Hard Drive. ACBC’s Merged Rows capability lets you accomplish this.
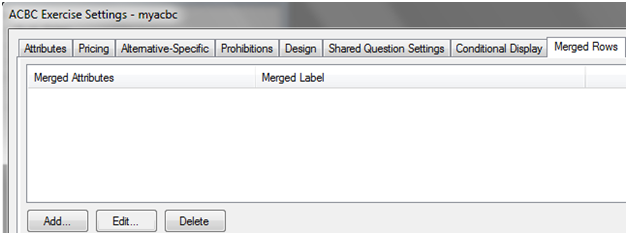
Click Compose | Write Questionnaire. Double-click any of the ACBC questions to open the ACBC Exercise Settings dialog. Click the Exercise Settings tab then click the Merged Rows tab.
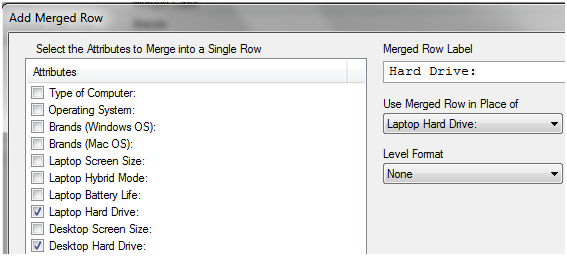
Click Add… to add a merged row specification. We’ll first add a merged row to collapse the brand information to the same row. Click the two brand attributes in the left panel, then type Brands: in the Merged Row Label field:
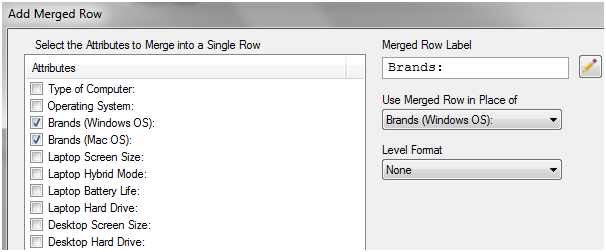
Click OK to save this merged row specification.
Next, let’s collapse the Laptop and Desktop screen size attributes into a common row. Click Add… to add another merged row specification. Specify:
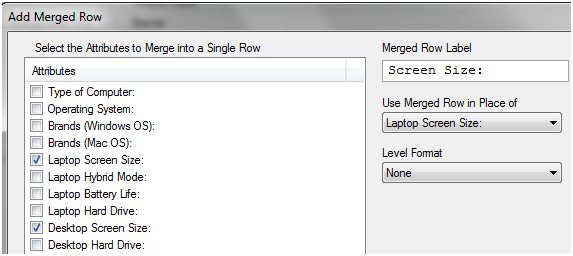
Click OK to save this merged row specification.
Last, let’s collapse the Desktop and Laptop hard drive attributes. Click Add… to add another merged row specification. Specify:
Now, when you preview a Screener Task, it looks like:
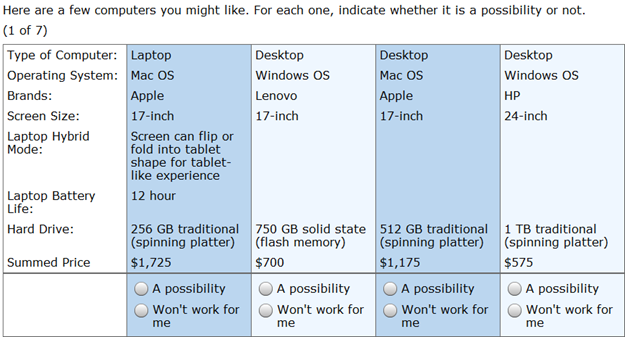
The attribute information is now much more compactly and logically laid out on the screen. Even though it looks to the respondent like there is just one generic attribute for screen size and one generic attribute for hard drive, the experimental design and utility calculation still recognize that there are alternative-specific attributes to be managed in the experimental design and estimated in terms of utility scores.
At this point, we have roughed in the ACBC survey. You can test run the survey and fine-tune the layout and wording of the questions. You may also wish to insert some transitional screen text between the major sections of the ACBC survey, using Text questions.
Non-Summed Price Option:
At the beginning of this tutorial, we mentioned that we’d describe how to program this survey without the Summed Pricing option. A more traditional approach to this kind of conjoint analysis problem is to use two alternative-specific price attributes:
Desktop Prices: $500 $600 $700 $900 $1,200 |
Laptop Prices: $600 $750 $900 $1,200 $1,500 |
If following this approach, then you would also typically skip the BYO question (since respondents would just pick the best levels of each attribute, since there is no price penalty exacted for, say, upgrading the hard drive).
If you would like to program this version of the ACBC questionnaire, take the following steps:
1.With the computers study still open in Lighthouse Studio, create a copy of your study (so you don’t lose your Summed Pricing version of the study), using File | Save Study As and call the new study computers2.
2.Click Compose | Lists and delete the Summed Price element from the Attributes list. (You will receive some warnings that you are about to change a list being used in the questionnaire and in the ACBC study. Confirm that you want to do this.)
Then, while still editing the Attributes list, add two new list elements at the bottom of the list (the 11th and 12th elements of that list):
Desktop Prices:
Laptop Prices:
3.Add two new predefined lists within the List Manager:
List: DesktopPrices
$500
$600
$700
$900
$1,200
List: LaptopPrices
$600
$750
$900
$1,200
$1,500
4.Edit the ACBC Exercise. On the Attributes tab, select the lists associated with Desktop prices and Laptop prices. Specify Sequence Order of Low to High and Preference Order of Best to Worst for both of these attributes.
Specify that all attributes should not be shown in the BYO question (we will skip the BYO question).
We’d recommend you not display either price attribute in the Must Haves and Unacceptables.
When you are done with step 4, the dialog should look like:
| 5. | On the Alternative-Specific tab, edit the Type of Computer Alternative-Specific rule to include information about the two new pricing attributes. For Desktop select Desktop Prices. For Laptop select Laptop Prices. See: |
| 6. | You next may receive a warning that the BYO concept cannot be included in the tournament if it hasn’t been asked (remember, we are skipping the BYO question). On the Design tab, un-check the box that says Include BYO in Tournament. |
| 7. | Add a new Merged Rows specification from the Merged Rows tab. Click Add… and then make that dialog look like the following: |

This merges the two separate price attributes onto the same row in the display.