Tutorial Specifications:
•Subject Matter: Choosing which beach to visit on vacation
•Design Summary: 8 attributes (no price attribute involved)
Note: We assume you are already familiar with Lighthouse Studio programming and standard CBC (Choice-Based Conjoint) research. If not, we recommend you complete the Tutorials for Lighthouse Studio and standard CBC.
Setting: You have been asked to work with Dr. Stephen Leatherman, "Dr. Beach," to determine which characteristics people most want in a beach. Dr. Leatherman is a professor at Florida International University that specializes in the study of beaches, and he is interested in refining his annual "Best Beaches" report.
Part 1: Attribute List
After discussions with Dr. Leatherman, you come up with a list of attributes that you both feel are the primary drivers of what makes a beach attractive.
Attributes:
Sand softness:
Water temperature:
Water safety:
Beach cleanliness:
Public Facilities:
Bottom structure:
Typical demographic:
Crowds:
Levels:
Sand softness:
Sand and rocks
Coarse sand
Medium sand
Fine sand
Water temperature:
60°F/15°C average (wetsuit required)
70°F/21°C average
80°F/27°C average
90°F/32°C average (bathwater)
Water safety:
No rip currents, few dangerous animals
Occasional rip currents, occasional dangerous animals
Frequent rip currents, occasional dangerous animals
Beach cleanliness:
Trash, glass and manmade rubble commonly found
Trash, glass and manmade rubble occasionally found
Trash, glass and manmade rubble rarely found
Public Facilities:
No public restrooms, showers or changing facilities
Public restrooms available, but no showers or changing facilities
Public restrooms, showers & changing facilities available
Bottom structure:
Sandy bottom underwater past shoreline
Rocky bottom underwater past shoreline
Coral bottom underwater past shoreline
Mud bottom underwater past shoreline
Typical demographic:
Popular with young partygoers
Popular with young families
Popular with mature adults
Crowds:
Uncrowded - ample open space
Somewhat crowded - some open space
Crowded - very little open space
Step 1: Create a new study
To begin programming this survey, open Lighthouse Studio and click File | New Study… Name the survey "beaches".
Step 2: Add attributes and levels as Lists (List Manager)
Once you've created your new survey, add the attributes and levels we've just defined. Use the List Manager (Compose | Lists…) to specify 9 total (predefined) lists:
attributes
sandsoft
watertemp
watersafety
cleanliness
facilities
bottom
demographic
crowds
For list: attributes, add the 8 attribute labels (as List Members):
Sand softness:
Water temperature:
Water safety:
Beach cleanliness:
Public Facilities:
Bottom structure:
Typical demographic:
Crowds:
For list: sandsoft, add the following List Members:
Sand and rocks
Coarse sand
Medium sand
Fine sand
Etc. Until you have fully specified all 9 lists.
Step 3: Attribute Settings
Click Compose | Write Questionnaire to open the Write Questionnaire dialog, then after the first page break, add (using Add…) an ACBC Exercise named "beach."
The ACBC Exercise Settings dialog appears, with eight tabs: Attributes, Pricing, Alternative-Specific, Prohibitions, Design, Shared Question Settings, Conditional Display, and Merged Rows.
Select the Attributes tab. For the List of Attributes, select attributes.
A dialog opens with one row per attribute (corresponding to each list element of attributes). For each attribute, click in the List of Levels field and use the drop-down to specify the associated list. For example, for attribute Sand softness: select sandsoft.
When you are done, the dialog should look like this:

Next, we need to inform ACBC if each attribute has sequence order (low to high or high to low) and, if so, the preference order (best to worst or worst to best). We also need to specify if each attribute should be included in the BYO and Must-Haves/Unacceptables sections. Two of the attributes (Water safety and Beach cleanliness) would seem to be obvious questions for most every respondent (respondents would generally prefer safer, cleaner beaches). It wouldn't seem to make much sense to ask respondents about these two attributes in the BYO question. If for some reason you felt that an attribute should not be included in the Must-Haves or Unacceptables questions, then you would also indicate it here (this could have a significant effect on estimated utilities, so we generally recommend caution with this functionality).
Specify the following settings on the Attributes tab:
Attribute |
Sequence Order |
Preference Order |
Include In BYO |
Include in Must-Haves and Unacceptables |
Sand Softness |
None |
None |
Yes |
Yes |
Water temperature |
Low to high |
None |
Yes |
Yes |
Water safety |
Low to high |
Best to worst |
No |
Yes |
Beach cleanliness |
High to low |
Worst to best |
No |
Yes |
Public facilities |
None |
None |
Yes |
Yes |
Bottom structure |
None |
None |
Yes |
Yes |
Typical demographic |
None |
None |
Yes |
Yes |
Crowds |
None |
None |
Yes |
Yes |
Step 4: Establish Necessary Prohibited Pairs
We generally discourage the use of prohibitions in conjoint exercises. However, we also recognize that, occasionally, a few prohibitions might be necessary to avoid illogical combinations. And, very modest prohibitions will not affect design efficiency much. (Warning: too many prohibitions can invalidate your study, so be careful!)
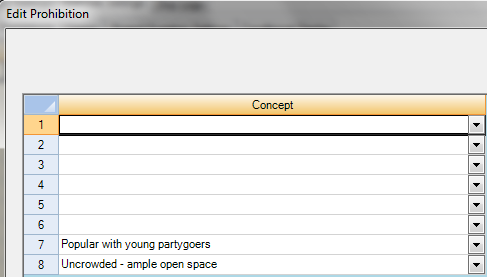
In our study, it might be unreasonable to believe that an uncrowded beach would be popular with partying college students. We'll therefore add a prohibition between "Popular with young partygoers" and "Uncrowded - ample open space".
On the Prohibitions tab, Click Add Prohibition… and specify a prohibition between Attribute 7, Level 1 and Attribute 8, Level 1.
This looks like:
Click OK to save the prohibition. Back on the Prohibitions tab, the prohibitions grid should now look like:
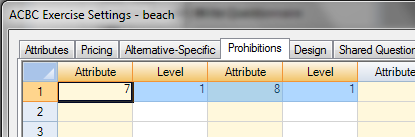
(Of course, you could have just directly typed these values into this grid, rather than use the Add Prohibition… button.)
Step 5: Design Settings
Go to the Design tab. This is where the bulk of your settings that control the flow of the questionnaire are found. The defaults that are shown are:
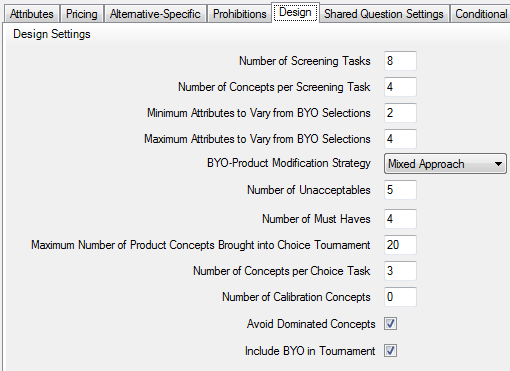
Let's reduce a few settings (to shorten the questionnaire, for the purposes of this tutorial):
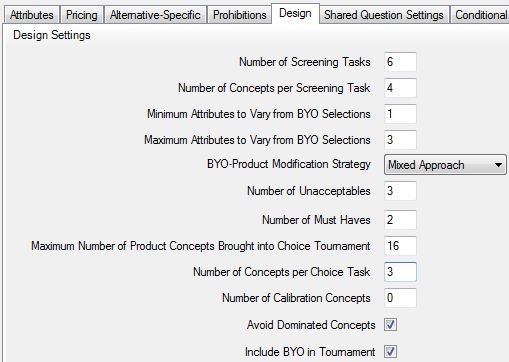
Number of Screening Tasks: change from 8 to 6
Minimum Attributes to Vary from BYO Selections: change from 2 to 1
Maximum Attributes to Vary from BYO Selections: change from 4 to 3
Number of Unacceptables: change from 5 to 3
Number of Must Haves: change from 4 to 2
Maximum Number of Product Concepts in Choice Tournament: change from 20 to 16
When you've made those edits, the dialog should look like:
This will lead to 6 Screening Tasks x 4 Concepts per Screening Task = 24 total "cards/concepts" in the design.
The respondents will get 3 Screening Tasks prior to seeing their first Unacceptables question.
The number of choice tasks in the Choice Tournament will be limited to 16/2 = 8.
Note that in the BYO question the respondent is only asked to specify their preferred beach on six of the eight attributes (we omitted Water Safety and Beach Cleanliness from the BYO question). The general rule is to vary no more than half of the BYO attributes from their BYO selections when generating the pool of near-neighbor concepts. Thus, we have changed the Min and Max attributes to vary to a more modest 1 and 3 attributes (instead of the default 2 and 4 attributes). For each new near-neighbor concept, between 1 to 3 of the six attributes included in the BYO question will be changed from their BYO selections. The other two attributes (Water Safety and Beach Cleanliness) will have levels chosen with roughly equal frequency to complete each full concept.
Step 6: View Questionnaire Layout and Edit Questions
From the ACBC Exercise Settings – beaches dialog, click OK to return to the Write Questionnaire dialog.
You should see the following question order for the ACBC section:
Question Name |
Question Type |
beach_BYO |
Build-Your-Own |
beach_Screener1 |
Screening Task |
beach_Screener2 |
Screening Task |
beach_Screener3 |
Screening Task |
beach_Unacceptable1 |
Unacceptables Question |
beach_Screener4 |
Screening Task |
beach_Unacceptable2 |
Unacceptables Question |
beach_MustHave1 |
Must-Have Question |
beach_Screener5 |
Screening Task |
beach_Unacceptable3 |
Unacceptables Question |
beach_MustHave2 |
Must-Have Question |
beach_Screener6 |
Screening Task |
beach_ChoiceTask1…8 |
Choice Task Tournament |
Edit BYO Question
Double-click the BYO question (near the top of the list questions) to edit it.
First, modify the text in Header 1 to say:
Please describe the beach you would most want to visit during summer vacation. Click your preferred choice for each feature below.
Now, let's click Preview to see what we've got to this point.
Go to the Question Settings dialog to examine the various formatting options you have for this question.
For example, you can change from a radio-button layout to a combo-box layout by selecting: BYO Layout = Dropdown. Try that, then click Preview to see the result.
You can modify other settings if you would like to investigate further formatting options.
Insert Text Question (optional)
Next, it would be helpful to inform respondents about the two attributes that we decided to drop from the BYO question (because they would have obvious answers).
We'd recommend that you insert a new Text question directly following the BYO question (on a separate page) that informs respondents about the two attributes that we omitted from the BYO question. Go back to the Write Questionnaire dialog. While highlighting the BYO question in the list of questions (so that when we add a page break it will be inserted directly below this question), click Add Page Break.... Next, click Add..., select Text as the type of question, and name it something like moretext1.
Place the following into the Header 1 of that Text question.
For your information, in the next stages of this interview, we'll also be asking you about beaches that differ in the following ways:<p>
<b>Water Safety:</b><br>
<ul>
<li>No rip currents, few dangerous animals
<li>Occasional rip currents, occasional dangerous animals
<li>Frequent rip currents, occasional dangerous animals
</ul><p>
<b>Beach Cleanliness:</b><br>
<ul>
<li>Trash, glass and manmade rubble commonly found
<li>Trash, glass and manmade rubble occasionally found
<li>Trash, glass and manmade rubble rarely found
</ul>
Edit Screening Tasks
Double-click any of the Screening tasks to edit the layout of these questions.
Edit Header 1 to say:
Here are a few beaches you might like. Do any of these look like possibilities? For each, indicate whether it is a possibility or not.
Click Preview, to see what we've got with the defaults.
You will note that the questionnaire might not fit well on your screen. It might be good to make the question a bit wider, so there isn't so much text wrapping across multiple lines. Another approach might be to make the attribute level text smaller. Both of these operations may be done from the Question Settings tab.
The Style that is selected for the study controls the layout and look of each question. You could try changing styles to see if a different style provides a better layout for ACBC questions. Or, you can directly override the style to control the width of the tasks and the font sizes.
To override the font size used for the level text, click the ![]() icon within the Level Display area of the Question Settings tab. On that dialog, you can specify a font size (in pixels), which overrides the font size controlled by the study Style. Specify a "12" for text with a 12 pixel point size. Click Preview again to see the effect on the question appearance.
icon within the Level Display area of the Question Settings tab. On that dialog, you can specify a font size (in pixels), which overrides the font size controlled by the study Style. Specify a "12" for text with a 12 pixel point size. Click Preview again to see the effect on the question appearance.
Edit Unacceptable Questions
From the Write Questionnaire dialog, double-click any of the Unacceptable questions to edit the layout of these questions.
The text header for this question varies depending on whether it is the first time this type of question has been seen by a respondent (a longer description) or whether the respondent has already seen this question type before (requiring a shorter description). Thus, we dynamically bring the text in using the function: [%ACBCUnacceptableText()%]
Leave the function as-is. You can edit the text supplied in this question using the Question Settings tab.
From the Question Settings tab, edit the No Rules Exist Label to specify the text to display the first time the respondent encounters the question. Click the ![]() icon edit the text. Write:
icon edit the text. Write:
Would any beach having the features below be <b>totally unacceptable</b>? If so, mark the <b>one feature</b> that is most unacceptable to you, so I can focus better on beaches that meet your needs.
Edit the Rules Exist Label to specify the text to display on subsequent Unacceptable questions (after the respondent has become familiar with this type of question). Write:
In addition to these unacceptable characteristics:<br><br> [% ACBCUnacceptableRules() %] <br><br>Is there another unacceptable feature?
Next, edit the None of the Above Label to say:
None of these is entirely unacceptable
Let's insert a graphic of an interviewer to the left of this question (change Side Panel Position from Right to Left). Click the ![]() icon to edit the Side Panel Text, click the "camera" icon, and browse to a graphic (use "Kylie, business, small format" the graphic's name is "kylie_300_bus_4.jpg"). You can download this graphic and other similar ones for use with Lighthouse questionnaires at: http://www.sawtoothsoftware.com/survey-graphics
icon to edit the Side Panel Text, click the "camera" icon, and browse to a graphic (use "Kylie, business, small format" the graphic's name is "kylie_300_bus_4.jpg"). You can download this graphic and other similar ones for use with Lighthouse questionnaires at: http://www.sawtoothsoftware.com/survey-graphics
Next, click Preview to see what we've got to this point.
Edit Must Have Questions
From the Write Questionnaire dialog, double-click any of the Must Have questions to edit the layout of these questions.
The text header for this question varies depending on whether it is the first time this type of question has been seen by a respondent (a longer description) or whether the respondent has already seen this question type before (requiring a shorter description). Thus, we dynamically bring the text in using the function: [%ACBCMustHaveText()%]
You edit the text supplied in this question using the Question Settings tab.
Edit the No Rules Exist Label to specify the text to display the first time the respondent encounters the question. Click the ![]() icon edit the text. Write:
icon edit the text. Write:
I don't want to jump to conclusions, but I've noticed you've chosen beaches with certain characteristics shown below. Are any of these <b>absolute musts</b> for the beach you would like to visit? If so, mark the <b>one most important feature</b>, so I can focus better on beaches that meet your needs.
Edit the Rules Exist Label to specify the text to display on subsequent Must-Have questions (after the respondent has become familiar with this type of question). Write:
In addition to:<br><br> [% ACBCMustHaveRules() %] <br><br>Are there any other absolute musts?
Next, edit the None of the Above Label to say:
None of these is an absolute must
Let's insert a graphic of an interviewer at the right of this question. Change the Side Panel Position from Left to Right. Click the ![]() button for Side Panel Text, click the "camera" icon, and browse to a graphic (use "Kylie, business, small format" the graphic's name is "kylie_300_bus_3.jpg"). You can get these graphics from our website, at: http://www.sawtoothsoftware.com/survey-graphics
button for Side Panel Text, click the "camera" icon, and browse to a graphic (use "Kylie, business, small format" the graphic's name is "kylie_300_bus_3.jpg"). You can get these graphics from our website, at: http://www.sawtoothsoftware.com/survey-graphics
Next, click Preview to see what we've got to this point.
Edit Choice Task Tournament Questions
Double-click any of the Choice Task Tournament questions to edit the layout of these questions.
Edit Header 1 to say:
Among these three, which beach would you most want to visit for summer vacation? (I've grayed out any identical features, so you can just focus on the differences.)
On the Question Settings tab you can also change Level Display Format so that the text is 12 point text always, irrespective of what Style is applied to the study.
Step 7: Randomize the Attribute List
To control for order bias, let's randomize the order of presentation of attributes (randomized once per respondent, and the order remains constant through the interview).
From the Compose | Lists area, add a new "Constructed" list called Rattributes (with "Parent" list = attributes). Use the following instructions to build Rattributes:
ADD (attributes)
RANDOMIZE()
Then, on the Attribute tab within the ACBC exercise (remember, to get back into the Exercise Settings tab, just edit any question in the ACBC series of questions), choose Rattributes as the attribute list instead of attributes. (You will see a warning message which you can ignore at this point because you have not yet collected data.)
You could do a similar trick to randomize levels within any attribute you wanted as well.
Step 8: Test Design
Before you take the questionnaire to field, you should use the Test Design functionality within ACBC software to send several "robotic respondents" through the survey, as if they were real respondents. This is a good practice, because Test Design will help you evaluate whether your ACBC questionnaire conforms to recommended best practices and is likely to lead to good results.
From the Exercise Settings | Design tab, you'll see an area called Test Design:
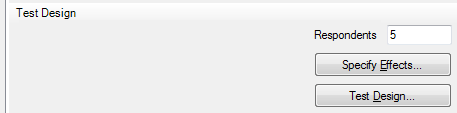
By default, five robotic respondents are set to take your ACBC questionnaire (answering randomly). For the key issue you should check--level frequencies--five respondents are sufficient. For high quality individual-level estimates, we recommend that each level appear at least twice and preferably three times for each respondent. If you plan to have relatively large sample size and are mainly interested in population estimates and predictions, then you could ignore that advice and use a shorter questionnaire (where each level isn't necessarily shown at least 2 or 3 times).
For this questionnaire, if the respondent doesn't establish any Unacceptable or Must Have rules, 24 cards (product concepts) are generated (6 Screening pages that include 4 concepts per page). We are concerned about how many times each attribute level appears across these 24 core product concepts.
Let's click Test Design and examine the report. Different computers will produce different results for the design report because the experimental designer takes advantage of the speed of the computer to perform more swaps and level relabelings to produce slightly more efficient designs. Thus, your results may not look exactly like those shown below.
(Due to space limitations, we've pasted the report into three sections, so you can see the frequency report for all eight attributes below):
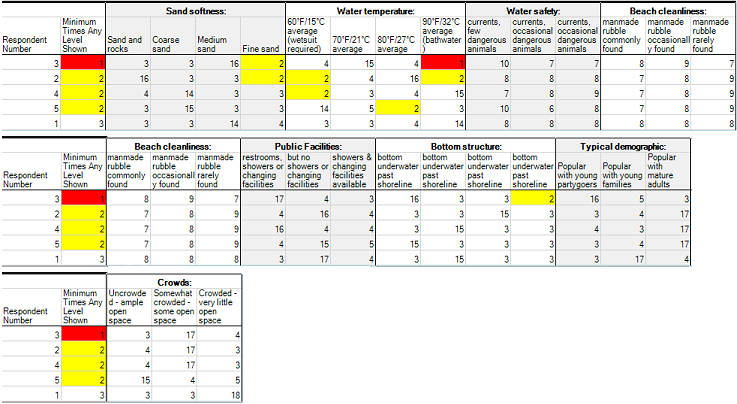
Five robotic respondents have completed the questionnaire. The report sorts the respondents in order from the respondent with the lowest count on any one level to the respondent with the highest count. For example, respondent #3 has a red cell for 90-degree Water Temperature (that level only occurs one time across all 24 product concepts included in respondent #3's questionnaire). This could be a point of concern, however the other 4 respondents have each level represented at least 2 times (those are color coded in yellow).
The general rule of thumb for ACBC is for each level to appear at least two times and preferably three times in each respondent's core design. We've nearly accomplished that here. If your sample size is relatively large and you don't require especially precise estimates at the individual level, then a result as we've displayed above would be satisfactory. But, if we required more precision at the individual level, we could change the settings for the ACBC questionnaire (on the Design tab) to include 7 screening tasks rather than 6 screening tasks (leading to 4 additional product concepts included in each respondent's design). The questionnaire will be a bit longer for each respondent, but you will achieve more information in the experimental design. If you do this, you should re-run the Test Design program to review the new frequencies for levels across attributes given the slightly longer questionnaire.
The Test Design report has four additional tabs that you may investigate. We recommend you press F1 to get more information regarding the report on each tab. We'll summarize some key points here:
Standard Errors tab This report shows the standard errors from pooled logit (across all robotic respondents) for each of the attribute levels. If you have specified any prohibitions, then standard errors are shown for your current questionnaire as well as for a questionnaire that does not include any prohibitions. This allows you to see how much relative efficiency is lost per attribute level due to the prohibitions you've specified. Note that it requires about 500 "robotic" respondents or more to obtain decent stability for the standard errors report! Running 500 respondents might take 20 minutes or more to generate, depending on the speed of your machine. For even more precision in this report, use 1000+ respondents.
Warnings tab For each robotic respondent and each design generation "pass" (we typically generate multiple designs for each respondent, then select the best one in terms of D-efficiency), we report whether there were any issues that prohibited the process from accomplishing all the specified goals. For example, the prohibitions you may have specified (or the request to avoid dominated concepts) may make it impossible for the designer to satisfy the goals of level balance and orthogonality. In such cases, certain goals may need to be relaxed to allow the software to generate a valid questionnaire for the respondent. More commonly, the warning may be reported as "Design optimize timed out. Proceeding with current concepts." That message means that for that "pass" in the designer, it wasn't able to do all the swapping and relabeling that could possibly be investigated, because it was running out of time (we don't want to make the respondent wait too long to see the next question in the questionnaire).
D-Efficiency tab For each robotic respondent, we compute the D-efficiency of the experimental design as if it were a traditional full-profile card-sort conjoint analyzed via OLS (where respondents saw each product concept just once and provided a rating for each). This approach to computing D-efficiency is the same as employed in our CVA software for traditional full-profile ratings-based conjoint. The D-efficiency if including the BYO tasks as additional rows in the design matrix is shown, followed by the D-efficiency if only using the experimental design for the product concepts (as with traditional full-profile conjoint). Note: because of the way ACBC generates "near-neighbor" concepts to each respondent's BYO-specified ideal, the D-efficiency of ACBC's array of product concepts is lower than for traditional full-profile arrays that are level-balanced and orthogonal. This is expected and many research studies comparing ACBC to more traditional D-optimal designs have shown that the ACBC process leads to part-worth utilities that have typically more precision at the individual level than the D-optimal approach, non-adaptive CBC. We expect ACBC's designs to have lower D-efficiency than traditional conjoint designs. Because of the benefits of the adaptive ACBC process, the practical end results are usually better than for traditional conjoint studies.
Individual Data tab Each robotic respondent's answers to the questionnaire are reported here.
Step 9: Test Questionnaire on Local Test Server
After you've seen the results of robotic respondents taking your ACBC questionnaire randomly, you should test the survey using human respondents who are answering reasonably. You can learn quite a lot by observing real respondents answering your survey and soliciting their feedback. This pre-testing of the questionnaire often leads the researcher to address problems with questionnaire wording or questionnaire length.
From the Write Questionnaire dialog, click the Test + Test Survey... to take the survey yourself (and/or ask other test respondents to take the survey). Answer the questions realistically and reasonably.
After you have completed your test survey(s), download the data by clicking Test | download data. A datafile is saved to your study folder (this is the main respondent data file). Please recognize that these test respondents are treated as real respondent data within the Analysis interface (you should delete them prior to conducting analysis with your final, real respondents).
We recommend you analyze your test data using Analysis | Analysis Manager | Add... and then select HB as the Analysis Type. ACBC usually obtains a great deal of accuracy at the individual level, so the utilities reported for your test respondents should have a great deal of face validity. You should review that the utilities seem to match quite well the preferences and strategies employed by the test respondents.
You can also use the test respondents' utilities within market simulator for further analysis. Click Analysis | Simulator... to view utility reports, charts, and to run competition market simulations.
By testing the design first with robotic respondents and later the questionnaire with real test respondents, you should gain a great deal of confidence that the ACBC survey will go well. We also recommend doing a "soft launch" to small sample of respondents (a dozen to thirty is often sufficient), downloading the data, and estimating the utilities using HB. Look at the interview time per respondent, the estimated utilities and any open-end comments the respondents have given you regarding their evaluation of the questionnaire.